• Skip to primary navigation
  • Skip to main content
  • Skip to primary sidebar
  • Home
  • Posts
    • Home Care and Cleaning
    • Home Decor and Design
    • Yard Work & Gardening
    • Food & Recipes
    • Pets
    • Health and Wellness
    • Motivation and Self Help
    • Home Tips
    • Parenting Advice & Tips
    • Parties, Events, Holidays, Fun
    • Things That Make Life Easier
    • Home Finance and Budgeting
    • Shopping Advice
  • Cat Central
  • Share a Home Tip
  • Got a Question?

Loving Our Home | Home Tips, Advice, and Easy Recipes

Simple Home Tips and Solutions

Food & Recipes

Southwestern Chicken With Pasta Shells

July 4, 2015 By LovingOurHome.com Leave a Comment

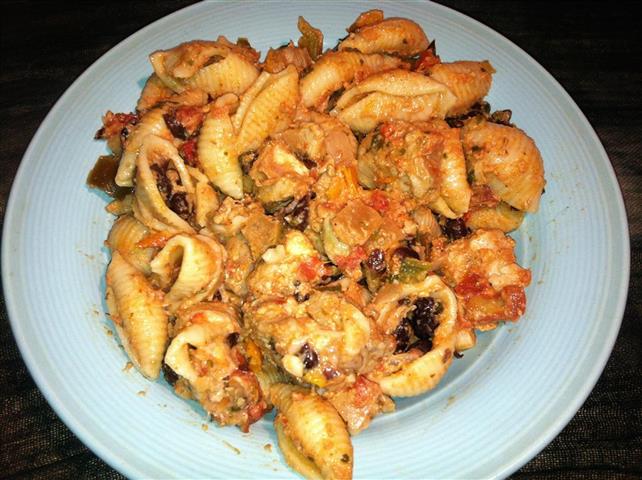
If you are in search of an exciting twist for your chicken dinner, you might want to give this recipe for Southwestern Chicken with Pasta Shells. It’s very flavorful and will leave you and your guests wanting more.

Ingredients

3 Chicken Breast Cut into small pieces (skin and bone removed)
1 Box of Pasta Shells (cooked al dente)
1 Can of Black Beans (drained)
2 1/2 Cups of Salsa
2 Tablespoons of Olive Oil
1/2 Yellow Onion (chopped)
1/2 Red Pepper (diced)
1/2 Green Pepper (diced)
1 Package of Cream Cheese
3 Teaspoons of Cumin
2 Teaspoons of Garlic Powder
1/4 Teaspoon Salt
1/4 Teaspoon Black Pepper
2 1/2 Cups Cheddar Cheese (shredded)

Southwestern Chicken With Pasta Shells

Instructions

In a large skillet, on medium high heat add oil, chicken breast, peppers, onions and sauté. Cook until chicken is done. Now add the cumin, garlic powder, salt and pepper to the pan and combine. Place heat on low and add salsa. Mix well. Next, add cream cheese and allow cheese to melt and blend with mixture. Add black beans, cheese and pasta shells. Stir with a large spoon. Put mixture into a large casserole dish, cover and bake at 325* for 10-12 minutes. Optional, to add a dollop of sour cream to plated dish.

** This recipe for Southwestern Chicken With Pasta Shells is pretty much a one pot meal. Keep in mind that you can use chicken thighs as a substitute for chicken breast.

Enjoy!!!


Share this:

  • Click to share on X (Opens in new window) X
  • Click to share on Facebook (Opens in new window) Facebook
  • Click to share on Pinterest (Opens in new window) Pinterest
  • Click to share on Tumblr (Opens in new window) Tumblr
  • Click to share on LinkedIn (Opens in new window) LinkedIn
  • Click to email a link to a friend (Opens in new window) Email
  • Click to print (Opens in new window) Print
  • More
  • Click to share on Reddit (Opens in new window) Reddit
  • Click to share on Pocket (Opens in new window) Pocket

Filed Under: Food & Recipes Tagged With: evelyns recipes, pasta, southwestern chicken

Meatball Stroganoff with Rotini Pasta

July 4, 2015 By LovingOurHome.com Leave a Comment

This is a delicious dish to make and rather simple to prepare. You can use ground beef, turkey, pork or chicken when making your meatballs. The meatballs and sauce in this recipe for Meatball Stroganoff with Rotini Pasta — full of herbs. #YUM

Ingredients for Meatballs

1 Lb Ground Beef
1 1/2 Tablespoons Basil (dried)
1 1/2 Tablespoons Oregano (dried)
1/2 Teaspoon Rosemary (dried)
1/2 Teaspoon Salt
1/2 Teaspoon Pepper

Stroganoff Rotini

Ingredients for Sauce

2 Cups of Beef Broth
1/2 Cup Sour Cream
1 Cup Heavy Whipping Cream
1/2 Tablespoon Basil
1/2 Tablespoon Oregano
1/2 Teaspoon Salt
1/2 Teaspoon Pepper

Preparing Meatballs

In a large bowl place ground beef and spices. Mix together using your hands. Make individual meatballs the size of golf balls. Then, in a large skillet on medium high heat, add 2 tablespoons of oil. Place meatballs in skillet and brown on all sides. When done remove meatballs from skillet and set aside.

Preparing Sauce

Now, in that same skillet add beef broth, to deglaze and bring to a boil. Allow broth to reduce by half. Then lower heat, add herbs, salt, pepper, whipping cream and sour cream. Whisk ingredients together. Place cooked meatballs into the sauce. Allow to simmer for five minutes.

Serve over rotini pasta, that is al dente.

You can use what ever type of pasta you like. I prefer rotini because it holds onto the sauce better than the traditional egg noodle. The choice is yours!

Enjoy

Posted by Eve


Share this:

  • Click to share on X (Opens in new window) X
  • Click to share on Facebook (Opens in new window) Facebook
  • Click to share on Pinterest (Opens in new window) Pinterest
  • Click to share on Tumblr (Opens in new window) Tumblr
  • Click to share on LinkedIn (Opens in new window) LinkedIn
  • Click to email a link to a friend (Opens in new window) Email
  • Click to print (Opens in new window) Print
  • More
  • Click to share on Reddit (Opens in new window) Reddit
  • Click to share on Pocket (Opens in new window) Pocket

Filed Under: Food & Recipes Tagged With: evelyns recipes, food, meatballs, pasta, recipes, rotini, stroganoff

3 Gourmet Burger Ideas for Grilling (Stuffed with Goodness)

June 22, 2015 By LovingOurHome.com Leave a Comment

When it’s time to grill, sometimes you feel like getting a little creative. A regular burger is great, but it’s just…. regular. Here are three deliciously different ideas for making an amazing gourmet burger for grilling.

Barbecue Outdoor Grilling

Chorizo and Mexican Cheese Burger

Flickr/ladymissmarquise

This burger is sure to delight people of all ages–it’s like eating a Mexican meal on a bun. Add Mexican seasoning to the meat including chili powder, cumin, salt, pepper, garlic powder and onion powder. Mix everything up well. Remove chorizo sausage from casing, cook thoroughly and drain excess oil. Allow it to cool. In the meantime, make two medium sized patties. Place one of the patties in the palm of your hand and create a well or depression in the middle. Add some chorizo and shredded Mexican cheese to the center. Place the other patty on top and pinch edges to create one big burger. Grill and serve on a toasted brioche bun with salsa or pico de gallo.

Mushroom and Gouda Cheese Burger

Flickr/u-suke

This is a great burger to make if you want something classic with a touch of sophistication. The Gouda cheese will give your burgers a wonderful smokey flavor. First, add salt and white pepper to the meat, then mix well. Slice mushrooms and chop Gouda into small chunks. Again, make two patties remembering that they will come together as one. Place one of the patties in the palm of your hand and create a depression. Add the mushrooms and Gouda to the center generously and pinch the edges closed for grilling. Serve on a toasted ciabatta or asiago roll with a bacon topping, dijon mustard and a drizzle of steak sauce.

Mediterranean Burger

Flickr/go2net

Here’s a burger idea inspired by Mediterranean style cooking. It’s simple to prepare and contains a lot of flavor. Add salt and Greek seasoning (here’s an example) to the meat and mix thoroughly. Make your two patties again, make a depression in one and add sliced black olives, crumbled feta cheese and fresh chopped spinach to the center. Place the other patty on the top and closed up the edges carefully. Grill and serve on toasted focaccia bread, a pita pocket or asiago roll with a slice of fresh tomato, tzatziki sauce and a drizzle of extra virgin olive oil.

All of these burgers will impress you, your friends and your family. Maybe this year you’ll finally be crowned “The Grill Master.”

Tip: When you’re buying ground beef for burgers, check the package for the meat to fat ratio.Your ground beef should be a minimum mix of 80% meat and 20% fat. This will yield a nice juicy burger.

Tip: You might choose to replace the ground beef with ground turkey for a lighter option.

Tip: Allow the meat to grill on both sides and do not press down burgers when on the grill.
Enjoy these gourmet burger ideas for grilling!!!

Posted by Eve


Photo credit: Flickr/ladymissmarquise, Flickr/u-suke, Flickr/go2net


Share this:

  • Click to share on X (Opens in new window) X
  • Click to share on Facebook (Opens in new window) Facebook
  • Click to share on Pinterest (Opens in new window) Pinterest
  • Click to share on Tumblr (Opens in new window) Tumblr
  • Click to share on LinkedIn (Opens in new window) LinkedIn
  • Click to email a link to a friend (Opens in new window) Email
  • Click to print (Opens in new window) Print
  • More
  • Click to share on Reddit (Opens in new window) Reddit
  • Click to share on Pocket (Opens in new window) Pocket

Filed Under: Food & Recipes Tagged With: burgers, chorizo, feta cheese, gouda, grilling, grilling season, mexican food, olives, summer

How to Make Homemade Ice Cream in a Bag

June 17, 2015 By LovingOurHome.com Leave a Comment

We’ve all had those moments of craving a pint of cold ice cream on a hot summer day or night. If you don’t really feel like running to the supermarket to pay $5.99 or more for a name brand ice cream, try making Ice Cream in a Bag. This is a simple way to make homemade ice cream without buying an ice cream maker.

Making ice cream in a bag is also great because you get to add your own ingredients. You can use a sugar substitute like Splenda or Stevia instead of white sugar and add sugar-free cookies and fresh fruits. You can also reduce sugar intake by using Half and Half instead of regular milk. The ideas are endless.

On this particular occasion, I decided to make chocolate ice cream with chocolate chip cookie pieces and strawberry ice cream with shortbread cookie pieces (see pics).

photo 5What You’ll Need…

Ice Cream in a Bag

  • About a cup of Half and Half or heavy cream (heavy cream is probably best for creamy ice cream, but Half and Half is the lowest in sugar)
  • The added ingredients you want (such as sliced frozen strawberries, cookies, Oreos, a bit of vanilla extract or vanilla beans for vanilla ice cream or a scoop of chocolate powder to make chocolate ice cream)
  • One tablespoon of Splenda, Stevia OR regular sugar
  • 1 or 2 small, strong zip lock bags
  • 2 large, strong zip lock bags
  • At least 2 cups of ice
  • 3 tablespoons of Kosher Salt

(Whatever you do, don’t add any water to the small bag full of cream! That makes it too icy.)

Instructions

Add your half and half, Splenda (or sugar), and all of your other desired ingredients to the small Ziploc bag and seal it securely. You might also add a tiny sprinkle of salt to the cream to bring out the flavor more. Reinforce with an additional small ziploc bag if you think it’s needed. Shake everything together thoroughly and make sure that there aren’t any leaks.

Ice Cream in a BagNow get the large Ziploc bag. Add ice along with the salt. Reinforce it with another large Ziploc bag just in case.

Place the small bag of cream inside of the larger Ziploc bags and zip those closed securely as well. Shake vigorously for 10-15 minutes. (The shaking process takes some time, but you can look at it as a moment to get some exercise and burn off some calories before you enjoy your cold treat 🙂

Scoop the ice cream out of the Ziploc bag, add any toppings you like and enjoy!

Make this Ice Cream in a Bag whenever you get a craving for something cold and sweet!

Posted by Jade

Strawberry Ice Cream in a Bag Chocolate Ice Cream in a Bag


Share this:

  • Click to share on X (Opens in new window) X
  • Click to share on Facebook (Opens in new window) Facebook
  • Click to share on Pinterest (Opens in new window) Pinterest
  • Click to share on Tumblr (Opens in new window) Tumblr
  • Click to share on LinkedIn (Opens in new window) LinkedIn
  • Click to email a link to a friend (Opens in new window) Email
  • Click to print (Opens in new window) Print
  • More
  • Click to share on Reddit (Opens in new window) Reddit
  • Click to share on Pocket (Opens in new window) Pocket

Filed Under: Food & Recipes, Home Tips Tagged With: desserts, homemade ice cream, ice cream, ice cream in a bag, recipes

Veggie Rice Summer Salad with Black Beans

June 16, 2015 By LovingOurHome.com Leave a Comment

I came across a recipe for Summer-style Orzo salad on one of my networks and it looked delicious. Unfortunately, I didn’t have any orzo and was missing a bunch of other key ingredients it suggested, so I improvised.

The result was this delicious Veggie Rice Salad with Black Beans. It is fresh, tasty and delicious. Perfect recipe to add to a summer meal (or good enough to eat by itself for lunch).

Ingredients
1 cup of rice
1.5 cups of water
3/4 of a chicken broth bullion
5 fresh basil leaves
1-2 chopped tomatoes (preferably Roma or grape tomatoes)
1 cucumber, chopped
1 chopped white onion
2 scallions, chopped
1/2 can of cooked black beans
1 teaspoon of Parmesan
1 fried chicken sausage, chopped (optional)

Vinaigrette Dressing
1/2 cup of olive oil
3 tablespoons of red wine vinegar
1 pinch of salt
1 pinch of pepper
1 teaspoon of oregano or Italian season mix
(Combine all of these vinaigrette ingredients into an empty water bottle and shake thoroughly.)

Boil bullion cube in water with a little olive oil. When it’s boiling briskly, add rinsed rice and turn down to medium heat. Cover and let simmer until cooked.

Prepare all chopped vegetables (except onions) and herbs to the side and dump them into a bowl. Chop up onions separately to fry in a little olive oil in a small pot along with optional chicken sausage. Add half a can of black beans (or your favorite bean) on top of onions and cook, covered, on low heat for about 3 minutes.

Add a few scoops of cooked rice (the fluffier the better) to the bowl containing vegetables. Add gently cooked beans, onions and optional chicken sausage (chopped). Drizzle with some of the vinaigrette dressing and then add Parmesan. Sprinkle with a bit of salt to enhance flavor.

Toss in the bowl until thoroughly mixed — add more rice and dressing as you see fit. Eat warm or chill for an hour in the fridge until dinner.

Enjoy this delicious Summer Veggie Rice Salad with Black Beans!

Posted by Jade

Share this:

  • Click to share on X (Opens in new window) X
  • Click to share on Facebook (Opens in new window) Facebook
  • Click to share on Pinterest (Opens in new window) Pinterest
  • Click to share on Tumblr (Opens in new window) Tumblr
  • Click to share on LinkedIn (Opens in new window) LinkedIn
  • Click to email a link to a friend (Opens in new window) Email
  • Click to print (Opens in new window) Print
  • More
  • Click to share on Reddit (Opens in new window) Reddit
  • Click to share on Pocket (Opens in new window) Pocket

Filed Under: Food & Recipes Tagged With: orzo salad, summer salads, veggie salad

Delicious Homemade Chicken Salad

June 14, 2015 By LovingOurHome.com Leave a Comment

This recipe for Delicious Homemade Chicken Salad is one of my favorite summer go-to meals. I really love the versatility of this salad. It can be a sandwich that is enjoyed for lunch or a main course for dinner with some veggies. Since my schedule can be erratic in the summer, I prepare a large quantity ahead of time. Another great thing about chicken salad is that you can use your favorite part of the chicken. For example, you can use the leg meat, thigh meat or breast. The choice is yours!

Ingredients

3 Cups Chicken Breast ( deboned and shredded )
2 Large Stalks of Celery ( finely diced )
1/4 Small Red Onion ( finely diced )
2 Tablespoons Mayonnaise ( more or less depending on your preference )
1/2 Teaspoon Salt
1/4 Teaspoon Black Pepper
1/4 Cup Raisins or Seedless Grapes Cut In Halves (optional)

Instructions

In a large pot, fill half way with water and add desired chicken pieces. Boil chicken pieces until done. For about 30 minutes on a high heat. Remember, that if you use chicken breast, it cooks faster than the other parts. Remove chicken parts from pot and let meat cool, in a large bowl, at room temperature or in the fridge for 20 minutes. Now, with either your hands, fork or knife shred or cube your chicken pieces. Return chicken to the large mixing bowl and add all other ingredients. Mix well and serve on bread or on top of salad.

Chicken Salad with Leafy Greens

Enjoy your delicious Homemade Chicken Salad!

Posted by Eve


Photo credit: Flickr/stuart_spivack


Share this:

  • Click to share on X (Opens in new window) X
  • Click to share on Facebook (Opens in new window) Facebook
  • Click to share on Pinterest (Opens in new window) Pinterest
  • Click to share on Tumblr (Opens in new window) Tumblr
  • Click to share on LinkedIn (Opens in new window) LinkedIn
  • Click to email a link to a friend (Opens in new window) Email
  • Click to print (Opens in new window) Print
  • More
  • Click to share on Reddit (Opens in new window) Reddit
  • Click to share on Pocket (Opens in new window) Pocket

Filed Under: Food & Recipes Tagged With: chicken salad, evelyns recipes, food, recipes, salads

  • « Go to Previous Page
  • Page 1
  • Interim pages omitted …
  • Page 5
  • Page 6
  • Page 7
  • Page 8
  • Page 9
  • Interim pages omitted …
  • Page 16
  • Go to Next Page »

Primary Sidebar

Categories

  • Beauty Tips
  • Cat Central
  • Dating, Love and Relationships
  • Food & Recipes
  • Health and Wellness
  • Home Buying or Renting
  • Home Care and Cleaning
  • Home Decor and Design
  • Home Equipment and Appliances
  • Home Finance and Budgeting
  • Home Improvement
  • Home Tips
  • Life Thoughts by Jas
  • Light Simple
  • Motivation and Self Help
  • Parenting Advice & Tips
  • Parties, Events, Holidays, Fun
  • Pest Control
  • Pets
  • Product Reviews
  • Quick Tips
  • Quotes
  • Shopping Advice
  • Special Deals
  • Summer Products
  • The Funnies
  • Things That Make Life Easier
  • Uncategorized
  • Yard Work & Gardening

Copyright © 2025 · Genesis Sample on Genesis Framework · WordPress · Log in