Posted by L.G.
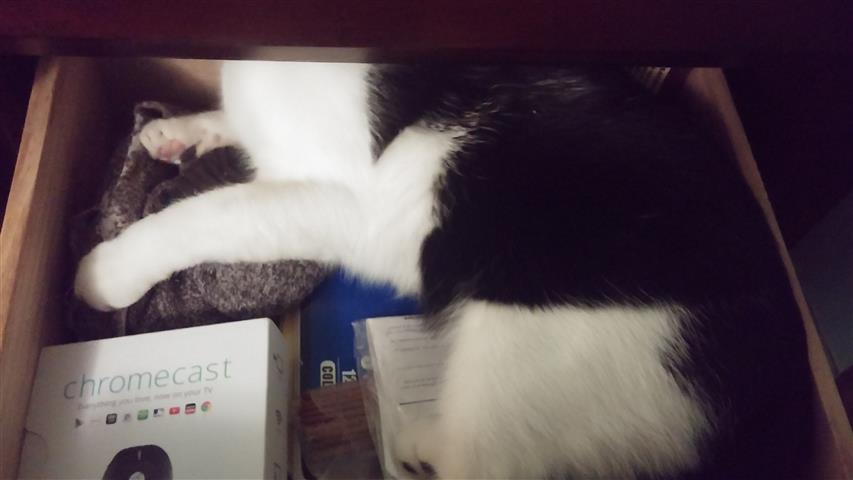
My cat climbed into a bottom drawer of my dresser and disappeared. I got tired of looking for her and went on with my day. An hour or so later I opened a small top drawer of the dresser and here’s what I see:
Loving Our Home | Home Tips, Advice, and Easy Recipes
Simple Home Tips and Solutions

Posted by L.G.
My cat climbed into a bottom drawer of my dresser and disappeared. I got tired of looking for her and went on with my day. An hour or so later I opened a small top drawer of the dresser and here’s what I see:
If you are fortunate enough to have a house with a yard, you know that it can be both a blessing and a “curse.” The effort it takes to beautify and maintain your property can be strenuous, but it is also rewarding. Whether, it is general maintenance or beautification, it can be time consuming to keep your yard looking wonderful. Here are a few yard work short cuts/cheats that will help make your yard work more manageable each year.
Make a List
First off, it helps to get everything down on paper. When you see the list of chores on paper, it doesn’t seem as difficult a task. You can then take each chore and divide them up over the weekend. So take a bit of time walking your yard to detail the chores that need to be done. This includes everything from leaf removal to trimming hedges and bushes to spraying your trees. Writing the items down will ensure that your precious time is not wasted and help you envision the process of completing each task.
Hire the Neighborhood Teens
In years past, it was commonplace for homeowners to hire neighborhood kids to help them with yard tasks. Chances are that you have at least one trustworthy, hard working teen in your area who would love to earn some extra cash on the weekend. Not only will it make your yard work easier to manage, it can also be beneficial to your relationships with neighbors. Cordially speak to the parents of the teens you may want to hire to negotiate a fair rate. $20 for a few hours of work is usually considered fair for a young person. With your written list in hand, ask your teen helper to do all of the bending, stooping, kneeling and heavy lifting that is required to complete the job. For your privacy and continued safety, have all of the materials and tools on the outside of your house, ready to be used. For a job well done, a tip may be in order. Keep relations friendly so that you have a good rapport with neighbors and teens for future years.
The Water Timer
As a yard owner, you realize that there are specific times that your lawn and garden needs water in order to thrive. Invest in an outdoor water timer that is easily attached to your water spout to make your yard tasks easier. Most modern timers allow you to set a start time, an end time and even have the water turn on at multiple times during the day. Human error can cause a yard to dry up when you forget to turn on the water — a timer is your safest bet. A quick note: some homeowners make the mistake of watering their lawns at the hottest time of day. All that does is cost you money because the water evaporates when the sun is at its peak, so you do not give your lawn the proper nourishment and hydration needed to keep it looking green and healthy. The best time to water your lawn is at sun up +\or sundown.
Use these yard work shortcuts/cheats are not difficult to accomplish. With a plan and a bit of effort, you will soon be entertaining more in your backyard instead of working!!
Posted by Eve
A good friend of mine came to me with a home designing dilemma. She needed to affordably transition her child’s bedroom to the “next level.” She had a toddler’s bed in the room, which the child outgrew. She had a few requirements for upgrading her child’s bedroom:
– it has to be a room that a child can enjoy for years to come (that way it doesn’t have to be upgraded again for a while)
– it has to be capable of entertaining play dates and sleepovers
– it has to be inspiring and spark the child’s imagination
– the update has to be affordable ($500 or less)
– the new bedroom must be able to handle the wear and tear of a growing child
– the bedroom must create an atmosphere of fun, excitement and inspiration for a child
These are all common requests of parents with transitioning toddlers and growing school-aged children. You want them to have a fun but also inspiring place to sleep. Here are a few furniture and decor ideas for creating a fun kid’s bedroom.
Fun Time Bed!
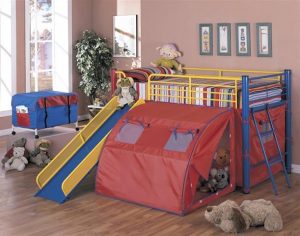 If you’re looking for a bedroom that your “rough and tumble” child will absolutely love, then this fun-time tent bed for kids is it. It’s a colorful coaster bunk bed with a slide, a tent and plenty of places to hide. It would be the perfect addition to a child’s “dream room.” Imagine sliding down the slide in the morning and having meals in the tent. Any child would look forward to bed time if this was in their room! You also save space, because the play area and bed are combined.
Here’s a second, more conservative option if you like the idea of a tent-slide bed for your child’s room, but want it to look modern.
Night Light Lamp
 Most young children prefer to sleep with a night light on. Upgrade your child’s bedroom and give him or her some extra comfort with this cute night light lamp that’s also a wallpaper sticker. The lamp is shaped like a doggie’s head, so when he lights up at night your child can see a friendly face shining on the wall. The cord that goes into the outlet looks like the dog’s leash!
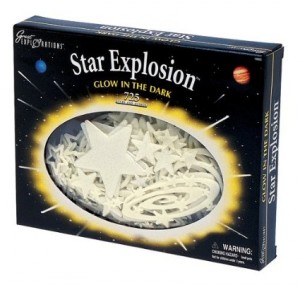
Star Gazing
 Les Brown famously said “Shoot for the moon, because even if you miss you’ll land amongst the stars.”
Do you remember those long nights as a child spent staring up at the ceiling, thinking and trying not to fall asleep? When your child is in bed at night and looks up at the ceiling, let him or her see “the stars.” Add these glow in the dark star stickers to the ceiling to help inspire your child and ensure that he or she has sweet dreams.
Have fun creating a fun and inspiring kids bedroom for your child!
Posted by Eve
My family really enjoys spaghetti night and anyone who knows Italian food understands that the tomato sauce is what makes the dish. This homemade spaghetti sauce recipe is great to use for just about any pasta dish, such as baked ziti, lasagna and even as a pizza sauce. Double this recipe and make plenty so that you can freeze and thaw the rest on another night for a super easy dinner. This recipe is best made with fresh ingredients, but it’s perfectly fine to use dried spices.
Ingredients:
 29 ounce can of tomatoes (I like Tuttoroso brand)
2 tablespoons tomato paste
1/2 of a small onion ( diced)
1/2 of a green pepper (diced)
3 garlic cloves ( grated)
1 lb of ground beef ( optional)
1 tablespoon of oregano
1/4 teaspoon dried red chile flakes
2 tablespoons extra virgin olive oil
1/2 teaspoon sugar
1 cup of water
Instructions
In a large sauce pan set on medium heat sauté diced onions cook till soft and place to the side
Add ground beef to pan and cook until meat is browned
Add can of tomato sauce and mash tomatoes with a potato masher
Add tomato paste
Bring to a simmer
Add onions and green pepper and grated garlic combine well
Add oregano, garlic, red pepper flakes, sugar, salt and pepper and water
Stir together
Set heat on low and simmer 45 minutes stirring occasionally
Serve over spaghetti or noodle of your choice.
This homemade spaghetti sauce is savory and delicious — so good that you might find it hard to resist grabbing a second helping. Enjoy!
Posted by Eve
The sunny and warm weather always prompts me to dust off my gardening tools and start planning this years placement for my vegetable plants and flowers. When each new grow season begins, I like to keep up to date with the latest innovative gardening tools and accessories, to help better manage my time (I like to barbecue and have fun on Saturdays and Sundays after all). Each season I also challenge myself to accomplish more in a day than I did the prior season. Listed below are three products that I believe are worthwhile to add to my gardening collection this year.
Green Giant Spiked Aerator Shoes
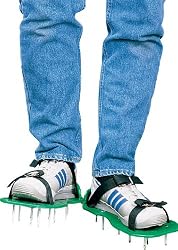 I LOVE flowers. They’re so fragrant and beautiful. I plan to use these spiked aerator shoes to help me break up the hard soil around my flower beds, to better assist my perennial flowers in breaking through the dirt to start their growing process sooner. By using these shoes, I will no longer have to strain my back to break up the soil. They also have a lot of other uses around my yard, such as aerating the grass and breaking up large pieces of dirt in my vegetable garden.
Plant Cages (Pea Tunnels)
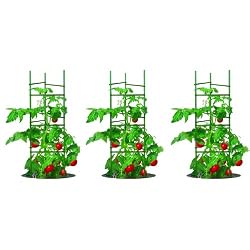
If you like to plant vine vegetables, this product will be helpful. Plant cages allow you to plant your vine vegetables in a more neat and tidy row in your garden. This tool will allow you to grow a lot more vine vegetables this year because you’re using “vertical” space.
Horticultural Fruit Picker — Apple Pear Peach Picking Tools
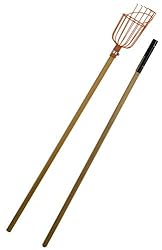 Every season I have to climb a ladder to remove fruit from the top of my pear and apple trees. I use to simply let them fall to the ground, but by that time they were ravaged by insects. What a waste of good fruit. That also brought an assortment of bees along with other undesirable insects. No more will I have to worry about that with this innovative gardening tool that picks apples, pears and peaches from high places. Just attach it to a pole and pick the desired fruit that you want.
As you can see, having these must-have gardening tools in your garage or backyard will make working out in your hard much easier and more productive this year. Have fun working in nature!
Posted by Lorraine
This recipe is for chocolate brownies and is a little healthier than other brownies because I have simply replaced all of the white cane sugar with a plant based sugar called Stevia. I also have replaced the butter and opted to use coconut oil instead.
I have always enjoyed baking homemade cakes and pastries. With all of the new research emerging about how white sugar negatively affects your health, I decided to use a more healthy sugar to bake with. My health research has also made me think about the ill affects of butter on the heart and circulation. That’s why I’ve decided to make these substitutions. To my surprise the taste is not impacted much — I do not miss the white sugar or butter. Here’s the recipe for delicious chocolate brownies made with Stevia & Coconut Oil:
Ingredients
 1 teaspoon vanilla extract
2 eggs
1 1/4 cup Stevia
1/2 cup flour
3/4 cups cocoa powder
1/4 teaspoon baking powder
1/2 teaspoon salt
3/4 cup coconut oil
Instructions
Preheat oven 325*
In a large bowl add
Softened coconut oil and cocoa powder, mix well
Then add
Stevia, mix well
Then add
Eggs
Flour
Salt
Baking powder
Vanilla extract, combine ingredients well
Then pour batter into a 8″ square baking pan, lightly greased for 30 minutes
Brownies are done when you stick a knife into the center and the knife is removed with no wet batter. You can even add chocolate chips or nuts to brownie batter!!
Enjoy your chocolate Brownies Made With Stevia & Coconut Oil!
Posted by Eve
