• Skip to primary navigation
  • Skip to main content
  • Skip to primary sidebar
  • Home
  • Posts
    • Home Care and Cleaning
    • Home Decor and Design
    • Yard Work & Gardening
    • Food & Recipes
    • Pets
    • Health and Wellness
    • Motivation and Self Help
    • Home Tips
    • Parenting Advice & Tips
    • Parties, Events, Holidays, Fun
    • Things That Make Life Easier
    • Home Finance and Budgeting
    • Shopping Advice
  • Cat Central
  • Share a Home Tip
  • Got a Question?

Loving Our Home | Home Tips, Advice, and Easy Recipes

Simple Home Tips and Solutions

Food & Recipes

Ideas for Leftover Juicing Pulp: Make Homemade Sausage!

September 27, 2015 By LovingOurHome.com Leave a Comment

Juicers: learn how to make homemade sausage with leftover juicing pulp.
* Warning, some of the pictures in this blog post are a little less than “appealing” but hey, we’re making sausage here! *
Homemade Sausage with Juicing Pulp
My very first try making homemade sausage with leftover juicing pulp. The flavor was good, but needed some more fat/oil to make it juicer.
I finally became a juicing convert after watching several food documentaries like “Hungry for Change” and the “Fat, Sick…” series featuring Joe Cross. The idea behind juicing is that when you have nutrients from vegetables and fruits in liquid form, it gets to your bloodstream quicker and starts to repair your cells. It’s like eating the nutritional value of a pound of veggies in one glass. I definitely feel an increased level of energy and mental clarity after juicing for just one month.
My Juicer
My Juicer
But one thing always bothers me a bit, and that is having to throw out so much pulp leftover from the juice. It’s high in fiber and should be used somehow.
One day as I was making my morning juice, I got the idea to use the pulp to make homemade sausage.The flavors of celery, cucumber, apple, pear and ginger would taste interesting with pork or turkey. It would also make for an even healthier breakfast.
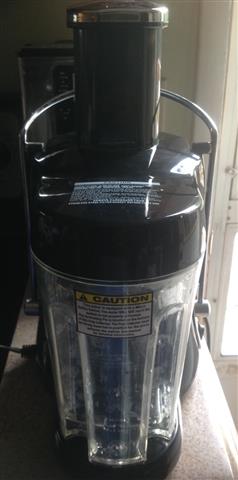
So I went on a hunt for supplies and picked up a package of ground turkey and a small package of pork sirloin steaks. I also needed the casing to make the sausage with, and found it at a nearby butcher shop. My friendly neighborhood butcher gave me a few tips for how to make your own sausage using a funnel.
So here is the process that I used from beginning to end. I’ve included a few adjustments that I would recommend that I didn’t do in my first batch to make the sausage more moist (mine came out tasty, but a bit dry).
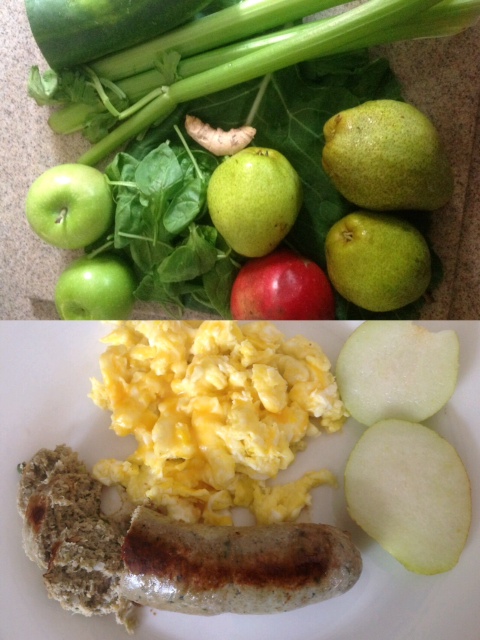
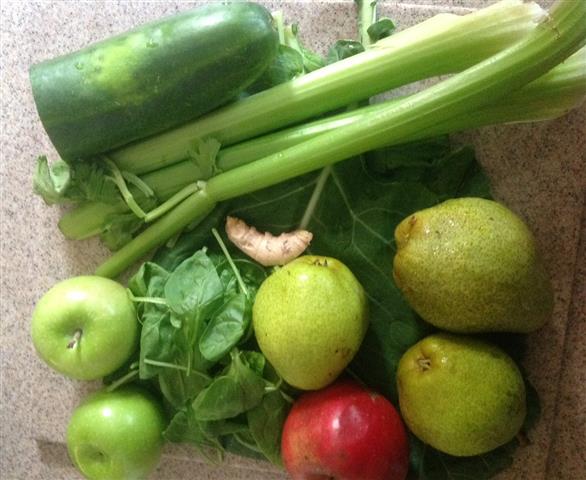
Here is what I normally juice. So the pulp will all end up in my sausage. Ginger root, cucumber, celery, pears, apples and greens. I added a bit of spinach this time also.
juicing veggies fruits
Ingredients
1 package of 80/20 ground pork, turkey or chicken (I used lean turkey my first time around, but I definitely wouldn’t recommend you use turkey if you like a juicy, flavorful sausage)
1 cup of your leftover juicing pulp
7-10 Garlic Cloves
2 Tbs of Salt
1 Tbs of Fennel seeds
1 Tbs of crushed black pepper (you want them a bit courser than the fine pepper that comes in a shaker)
Half a teaspoon of red pepper flakes *optional (if you like your sausage a little hot)
About 1/4 cup of olive oil *optional (if you have a meat with high fat content like pork, the oil probably isn’t necessary)
A few feet of pork sausage casing (find it at a butcher shop or online here – there’s also a casing available that is made of beef)
A large kitchen funnel (you can find one at the dollar store hanging up among kitchen items – there are also affordable sausage makers available if you prefer to make this process easier)
ingredients for sausage made with juicing pulp
Instructions
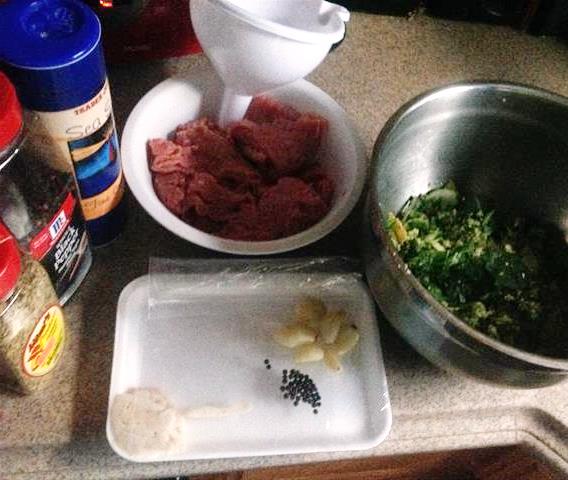
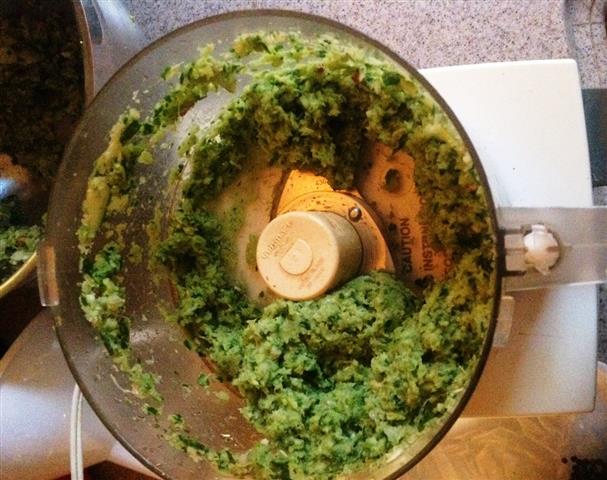
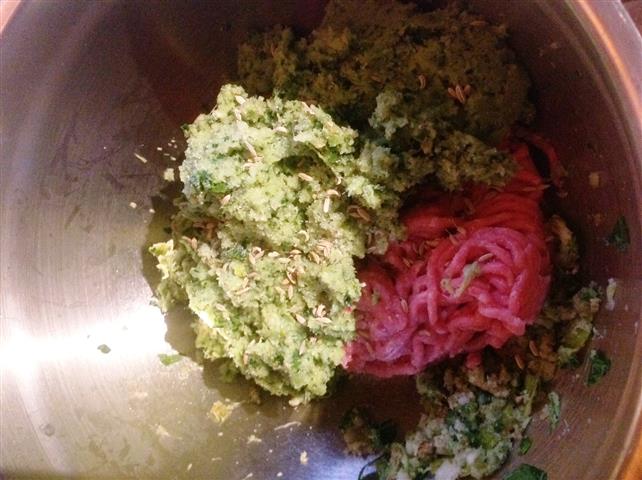
Sort through the juicing pulp and pull out the big pieces that didn’t break down enough in the juicing process. Put them into a food processor along with your garlic cloves and process for about a minute.
sausage mix with juicing pulp
In a large bowl, combine your juicing pulp, the package of ground meat and the mixture from the good processor along with all other ingredients. Mix it all together thoroughly with your fingers. Check the consistency and add more olive oil if needed to make it more moist.
sausage mixture (Small)
Grab your funnel and attach the open end of the sausage casing to the tube (see picture). Measure off about 8 inches more of the casing and cut it with scissors. Tie a knot on the other end of the sausage casing.
casing and funnel (Small)
sausage casing (Small)
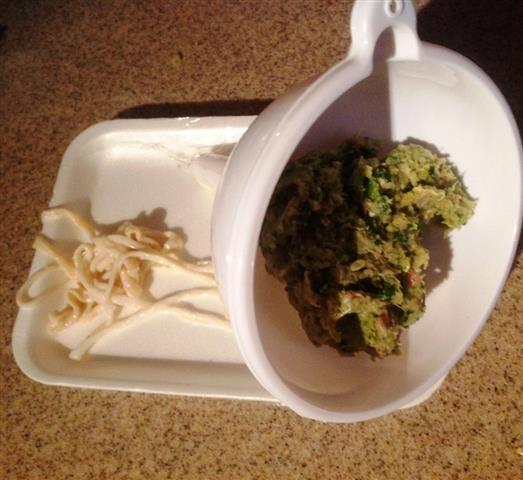
Start stuffing your meat mixture into the open side of the funnel. Use the tips of your finger to push the meat into the casing. When filled, remove it from the funnel and tie the other casing end closed.
** Important tip. Make just ONE sausage first, fry it up, and taste it to ensure that it’s to your liking. If not, adjust the ingredients as needed (salt, oil, etc).
 finished homemade sausages (Small)
homemade sausage (Small)
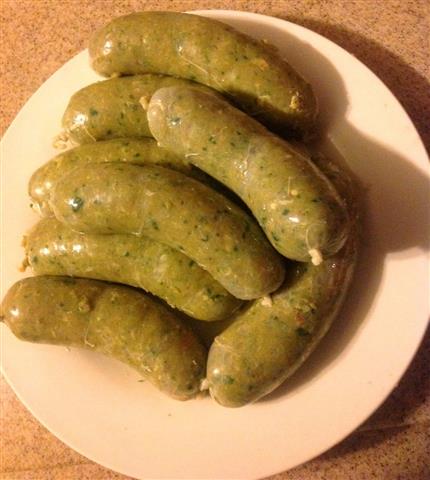
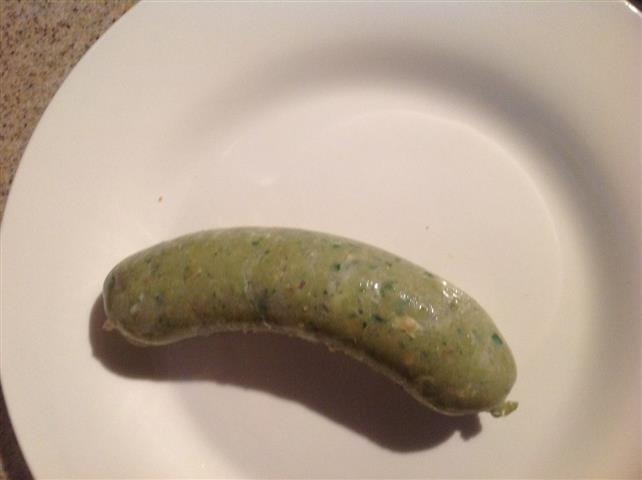
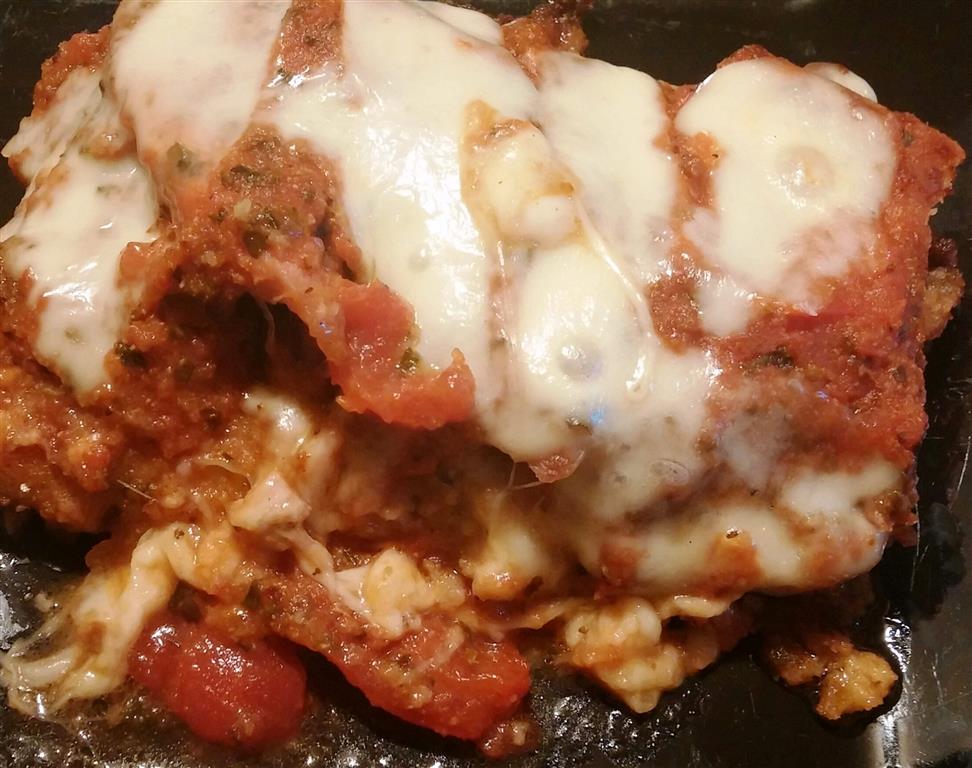
And voila, you have a homemade sausage made with leftover juicing pulp!
Homemade Sausage Made with Leftover Juicing Pulp
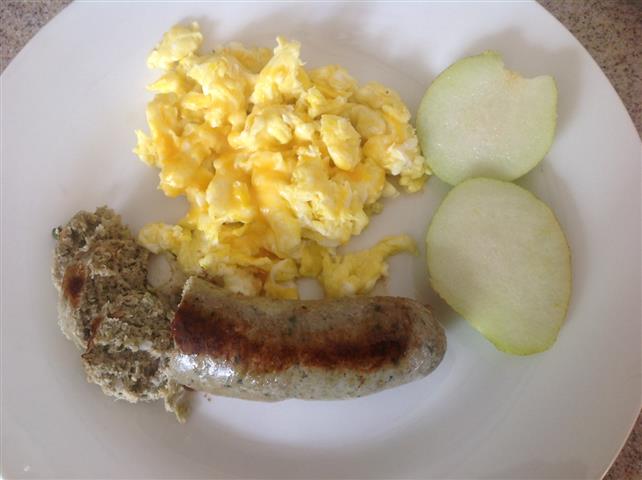
Enjoy it in the morning with breakfast or add it to an Italian style sauce.
Posted by Jas

Share this:

  • Click to share on X (Opens in new window) X
  • Click to share on Facebook (Opens in new window) Facebook
  • Click to share on Pinterest (Opens in new window) Pinterest
  • Click to share on Tumblr (Opens in new window) Tumblr
  • Click to share on LinkedIn (Opens in new window) LinkedIn
  • Click to email a link to a friend (Opens in new window) Email
  • Click to print (Opens in new window) Print
  • More
  • Click to share on Reddit (Opens in new window) Reddit
  • Click to share on Pocket (Opens in new window) Pocket

Filed Under: Food & Recipes Tagged With: homemade sausage, how to make sausage, juicing ideas, juicing pulp, juicing pulp ideas, juicing recipes, leftover juice pulp ideas

Tasty 10 Minute Meal Ideas for Kids

September 20, 2015 By LovingOurHome.com Leave a Comment

When the kids are back to school, of course they arrive home at the end of a long day HUNGRY. But you’ve had a long day too. You don’t always have to stress about making a big dinner — here are a few easy to make, tasty 10 minute meal ideas for kids.

Chicken Wrap - 10 Minute Meal Ideas

Chicken Wraps With Honey Mustard Sauce
Wraps are filling and quick to make. Just quickly grill some sliced chicken breast in olive oil. Place a few slices on a wrap of your choice, then add lettuce and shredded cheese. Make your sauce by combining Dijon mustard and a bit of honey. Drizzle the sauce on top and fold wrap. If you don’t feel like grilling the chicken, substitute it with a few slices of deli turkey meat.

Mouth Watering Mini Sliders
Sliders are always a hit with young kids, and they’re easy to make. In a large bowl add the ground meat of your choice, whether it’s ground beef, chicken, pork or turkey. Add Worcestershire Sauce to the ground beef and combine with a spoon or your fingers. Now make little sliders out of the meat and fry them on medium-high heat (about 4 minutes each side). If you can not find small buns for your sliders, simply take a large cup and press the rim onto a slice of bread. Put slices of cheese and other condiments on the table so that your kids can dress up their dinner themselves.

Shish Kabobs With Yogurt Sauce
Cut chicken breast into large cubes. Then cut onions and peppers into cubes. Start your skewer with onion then the chicken then pepper. Repeat. Generously sprinkle Greek seasoning on the skewers. Grill it in a pan or a George Foreman grill. While it’s cooking, mix Greek yogurt, parsley, salt and pepper in a bowl until well combined. When skewers are done drizzle the sauce on top. (FYI if using wooden skewers soak them in water so the skewer does not burn and cut off any pointy ends for safety.) This meal can be served on a bed of cucumbers or on top of a salad.

Stay tuned for even more 10 minute meal ideas for kids to help make meal time easier for you and your family.


Photo credit: Flickr/dannynic

Share this:

  • Click to share on X (Opens in new window) X
  • Click to share on Facebook (Opens in new window) Facebook
  • Click to share on Pinterest (Opens in new window) Pinterest
  • Click to share on Tumblr (Opens in new window) Tumblr
  • Click to share on LinkedIn (Opens in new window) LinkedIn
  • Click to email a link to a friend (Opens in new window) Email
  • Click to print (Opens in new window) Print
  • More
  • Click to share on Reddit (Opens in new window) Reddit
  • Click to share on Pocket (Opens in new window) Pocket

Filed Under: Food & Recipes, Parenting Advice & Tips, Things That Make Life Easier Tagged With: 10 minute meals, dinner for kids, kid friendly dinners, mini sliders, shish kabobs, yogurt sauces

Pork Wraps Made with Boneless Ribs

September 18, 2015 By LovingOurHome.com Leave a Comment

This recipe for Pork Wraps Made with Boneless Ribs is a way to put those frozen, boneless leftover ribs from summer barbecues to good use. This wrap is an unique way to use the ribs to feed you and your entire family. With just a few added ingredients, you have a delicious meal.

Pork Wraps with Boneless Ribs

Ingredients

1-2 Lbs boneless pork ribs (beef boneless ribs are ok)
1/4 cup of oil
1-2 tablespoons mesquite seasoning
1/4 cup of barbecue sauce (your choice)
1/4 cup of red onion thinly sliced (white onion is ok)
3 large mushrooms thinly sliced
4-5 baby peppers (red, yellow, orange) sliced into rings
3 tablespoons flour
2-4 white flour tortilla wraps

Instructions

In a large sauce pan add 1-2 tablespoons of oil and place in diced onions, mushrooms and peppers. Sauté until tender. Remove from pan. Now, slice ribs into 1/4 inch pieces and season with mesquite seasoning. Then add flour to coat ribs. Put your sauce pan on medium high heat, add oil and fry rib pieces on both sides until it is golden brown. Add cooked onions, mushrooms and peppers to pan with rib meat. Sauté for about 3-4 minutes. Remove from heat. Place tortillas on a plate in the microwave and warm. Divide rib meat mixture evenly onto tortillas and drizzle barbecue sauce generously on top. Create your wrap.

Enjoy this recipe for Pork Wraps Made with Boneless Ribs with a drizzle of greek yogurt or ranch dressing!

Posted by Eve

Share this:

  • Click to share on X (Opens in new window) X
  • Click to share on Facebook (Opens in new window) Facebook
  • Click to share on Pinterest (Opens in new window) Pinterest
  • Click to share on Tumblr (Opens in new window) Tumblr
  • Click to share on LinkedIn (Opens in new window) LinkedIn
  • Click to email a link to a friend (Opens in new window) Email
  • Click to print (Opens in new window) Print
  • More
  • Click to share on Reddit (Opens in new window) Reddit
  • Click to share on Pocket (Opens in new window) Pocket

Filed Under: Food & Recipes Tagged With: boneless ribs, evelyns recipes, family dinner, pork ribs, pork wrap, recipes

Italian Breaded Chicken Recipe with Ham, Tomato Sauce & Mozzarella Cheese

September 18, 2015 By LovingOurHome.com Leave a Comment

This Italian Breaded Chicken Recipe with Ham, Tomato Sauce & Mozzarella Cheese is a hearty meal for a family of four. The flavors are amazing together — it will taste as if you spent all day in the kitchen preparing this meal.

Italian Breaded Chicken with Ham, Tomato Sauce & Mozzarella Cheese

Ingredients

4 chicken thighs deboned and flattened between wax paper
2 whole eggs beaten
1 cup of seasoned bread crumbs
4 slices of lightly salted ham 1/4 ” thick (avoid sweetened ham for this recipe)
1 medium can of seasoned chunk tomatoes (salt, pepper, garlic, basil, oregano)
1 cup of shredded mozzarella
1/2 cup oil
2 cups egg noodles cooked (optional)

Instructions

Place beaten eggs in a large bowl. In another large bowl add bread crumbs. Place oil in a large fry pan on medium high heat. First, take a thigh and cover completely with egg. Then place thigh into the bread crumbs. Be sure to coat both sides. Carefully place in fry pan. Repeat. Make sure to brown both sides. Preheat oven to 350* Place fried chicken thighs in a large casserole dish. Top chicken with one piece of ham. Then pour chunk tomatoes over ham. Lastly, cover with mozzarella cheese and bake for 10-12 minutes until cheese is melted and golden brown. Serve over buttered egg noodles if you’d like.

Enjoy this Italian Breaded Chicken Recipe with Ham, Tomato Sauce & Mozzarella Cheese with a soft breadstick or salad!

Posted by Eve

Share this:

  • Click to share on X (Opens in new window) X
  • Click to share on Facebook (Opens in new window) Facebook
  • Click to share on Pinterest (Opens in new window) Pinterest
  • Click to share on Tumblr (Opens in new window) Tumblr
  • Click to share on LinkedIn (Opens in new window) LinkedIn
  • Click to email a link to a friend (Opens in new window) Email
  • Click to print (Opens in new window) Print
  • More
  • Click to share on Reddit (Opens in new window) Reddit
  • Click to share on Pocket (Opens in new window) Pocket

Filed Under: Food & Recipes Tagged With: evelyns recipes, ham recipes, italian food, italian recipes, mozzarella, recipes

Easy Homemade Chicken Noodle Soup for Fall

September 5, 2015 By LovingOurHome.com Leave a Comment

A hearty chicken noodle soup is always a nice meal to enjoy in the fall. Sipping on hot soup is a great way to fight off the chill in the air as the weather starts to change. An added bonus of this recipe for Homemade Chicken Noodle Soup is that it keeps well in the refrigerator and can even be frozen for future consumption. It’s a simple meal that is very tasty and filling.


Homemade Chicken Noodle Soup
Ingredients

1/2 Chicken or 3 Large Chicken Thighs fully cooked, deboned, skin and bones removed, chopped into chunks
3 large stalks of celery chopped
1 medium onion roughly chopped
4 chicken bouillon cubes
8 cups of water
1/2 tsp pepper
2 cups large egg noodles cooked
1/4 cayenne pepper (optional)
Salt to taste

Instructions

In a large pot put in all your ingredients on high heat.
Bring to boil, then reduce heat to low
Allow to simmer until carrots are tender
*Optional: Serve with grilled cheese sandwich

Enjoy this delicious Homemade Chicken Noodle Soup for the fall!

Posted by Eve

Share this:

  • Click to share on X (Opens in new window) X
  • Click to share on Facebook (Opens in new window) Facebook
  • Click to share on Pinterest (Opens in new window) Pinterest
  • Click to share on Tumblr (Opens in new window) Tumblr
  • Click to share on LinkedIn (Opens in new window) LinkedIn
  • Click to email a link to a friend (Opens in new window) Email
  • Click to print (Opens in new window) Print
  • More
  • Click to share on Reddit (Opens in new window) Reddit
  • Click to share on Pocket (Opens in new window) Pocket

Filed Under: Food & Recipes Tagged With: chicken noodle soup, chicken soup, fall recipes, fall soup, homemade soup

How to Regrow Food from Scraps

August 22, 2015 By LovingOurHome.com Leave a Comment

I read an article recommended by a friend a few weeks back about regrowing food from scraps, including scallions, celery and lettuce, and just had to give it a try. I quickly learned that I could regrow a scallion in about a week to its full size. Here’s the proof:

Regrowing ScallionsThis is definitely information that your local grocery store doesn’t want you to know! So I was excited to find about this amazingly comprehensive piece from CustomMade.com about how to regrow 19 different types of vegetables. I’m excited to experiment with carrots and lettuce next! Click the image to see the full list:

regrow-food-scraps-018

Image courtesy of CustomMade.com

Share this:

  • Click to share on X (Opens in new window) X
  • Click to share on Facebook (Opens in new window) Facebook
  • Click to share on Pinterest (Opens in new window) Pinterest
  • Click to share on Tumblr (Opens in new window) Tumblr
  • Click to share on LinkedIn (Opens in new window) LinkedIn
  • Click to email a link to a friend (Opens in new window) Email
  • Click to print (Opens in new window) Print
  • More
  • Click to share on Reddit (Opens in new window) Reddit
  • Click to share on Pocket (Opens in new window) Pocket

Filed Under: Food & Recipes, Things That Make Life Easier Tagged With: celery, gardening, lettuce, regrow vegetables, scallions, vegetables

  • « Go to Previous Page
  • Page 1
  • Page 2
  • Page 3
  • Page 4
  • Page 5
  • Page 6
  • Interim pages omitted …
  • Page 16
  • Go to Next Page »

Primary Sidebar

Categories

  • Beauty Tips
  • Cat Central
  • Dating, Love and Relationships
  • Food & Recipes
  • Health and Wellness
  • Home Buying or Renting
  • Home Care and Cleaning
  • Home Decor and Design
  • Home Equipment and Appliances
  • Home Finance and Budgeting
  • Home Improvement
  • Home Tips
  • Life Thoughts by Jas
  • Light Simple
  • Motivation and Self Help
  • Parenting Advice & Tips
  • Parties, Events, Holidays, Fun
  • Pest Control
  • Pets
  • Product Reviews
  • Quick Tips
  • Quotes
  • Shopping Advice
  • Special Deals
  • Summer Products
  • The Funnies
  • Things That Make Life Easier
  • Uncategorized
  • Yard Work & Gardening

Copyright © 2025 · Genesis Sample on Genesis Framework · WordPress · Log in