• Skip to primary navigation
  • Skip to main content
  • Skip to primary sidebar
  • Home
  • Posts
    • Home Care and Cleaning
    • Home Decor and Design
    • Yard Work & Gardening
    • Food & Recipes
    • Pets
    • Health and Wellness
    • Motivation and Self Help
    • Home Tips
    • Parenting Advice & Tips
    • Parties, Events, Holidays, Fun
    • Things That Make Life Easier
    • Home Finance and Budgeting
    • Shopping Advice
  • Cat Central
  • Share a Home Tip
  • Got a Question?

Loving Our Home | Home Tips, Advice, and Easy Recipes

Simple Home Tips and Solutions

organic garden

Organic Raised Garden Box: How I Did It

July 8, 2019 By LovingOurHome.com Leave a Comment

How I made a 3 x 5 foot garden box so that I could grow a small raised organic garden.

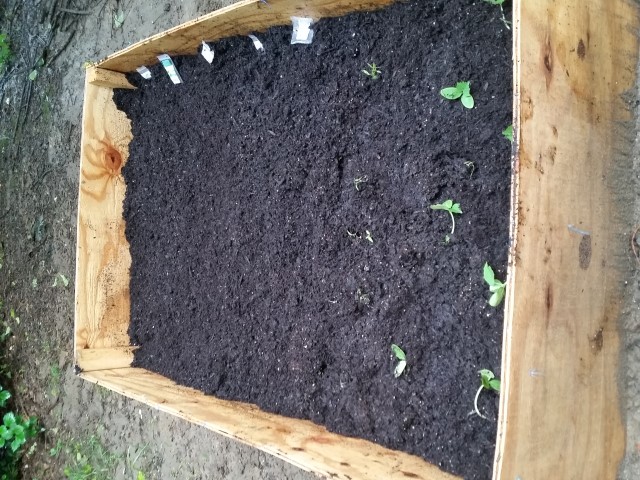
I’ve been envisioning this project for some time now, and finally put things into motion last month. The soil on my property isn’t the best, and I’ve sprayed it with Ground Clear on several occasions in the past, so I knew that if I decided to start a garden it would have to be in a raised box with new, fresh soil added in. I decided to fill the box with half regular soil, half organic soil to keep the cost reasonable. I would say this entire project cost me about $125. Before I get into my steps, this is what it looks like now:

Raised Garden Box

These are the steps I took to create my organic raised garden box.

Step 1: Drawing Up the Plans

The first step of creating a raised garden box is determining how large and deep you want it to be. I decided on 3 x 5 feet, with a depth of about 2 feet. The depth you choose will depend on the types of vegetables you want to grow — some, like tomatoes, require about 18 inches, while others only need about six inches for proper root growth.

Step 2: Shopping for Wood and Supplies

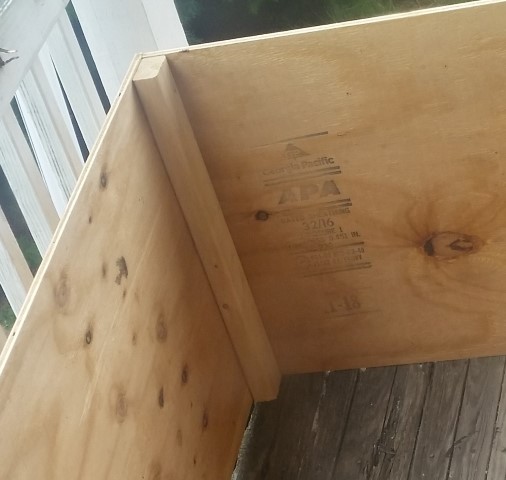
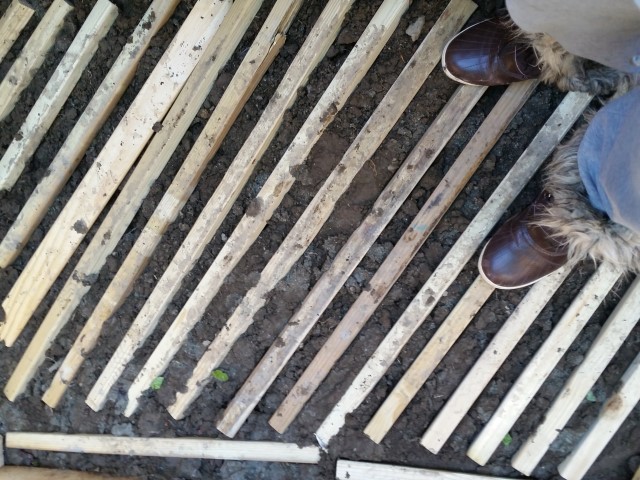
I got help on this step from the guy at my local hardware store. I found a large plank of plywood that cost about $19. It was sized just right so that I could have it cut to two (2) five foot pieces, and two (2) three foot pieces. Note: from what I’ve learned, it’s fine and probably preferable to choose pre-treated wood for an organic garden — it helps avoid rot and the potential effects of insects. I used my own organic treatment mixture to help protect the wood (lemon, vinegar, water, peppermint spray) but I think the pre-treated wood is fine. After cutting the plank into four pieces, the guy in the hardware store recommended anchoring them with 2 x 4 posts at the corners with screws (see the photo below for clarity). He cut the large 2 x 4 post into 4 equal posts. I also purchased a box of outdoor screws.

Step 3: Assembling the Raised Garden Box

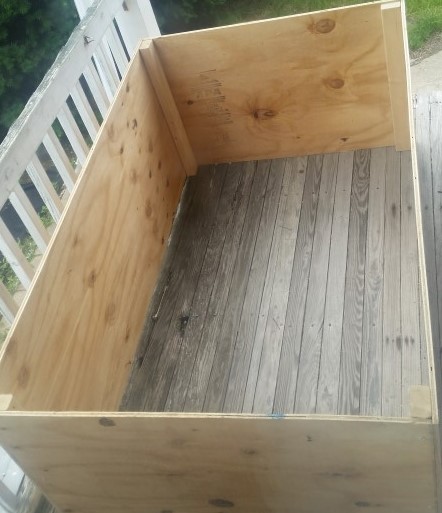
Keep in mind that you need to keep the bottom of your garden box open so that water can filtrate into the ground. So you only need to assemble the sides. I used a drill to place three screws at each corner/side, with the 2 foot post on the inside corner as the anchor. Again, it sounds complicated, but not really — just look at the photo. When assembled it looked like this:

Step 4: Choosing a Location for Your Raised Organic Garden Box

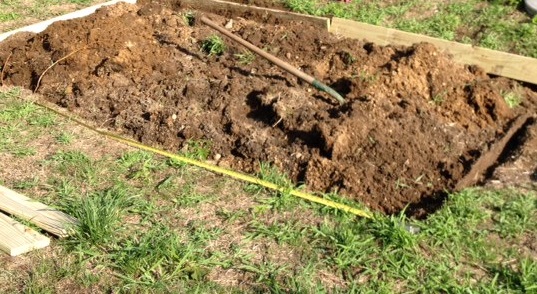
Choose a place for your box that will get at least four hours of direct sunlight each day for the best results. I placed the box down, then traced an outline of it with my shovel. I then removed the box again and dug about two inches down inside the rectangle. This was to ensure that the box would stay in place. I then put the box back inside the rectangle and used the excess soil to shore it up around the sides. I also laid excess treated wood at the bottom of the box to help minimize the chance of anything being about to dig under the soil.

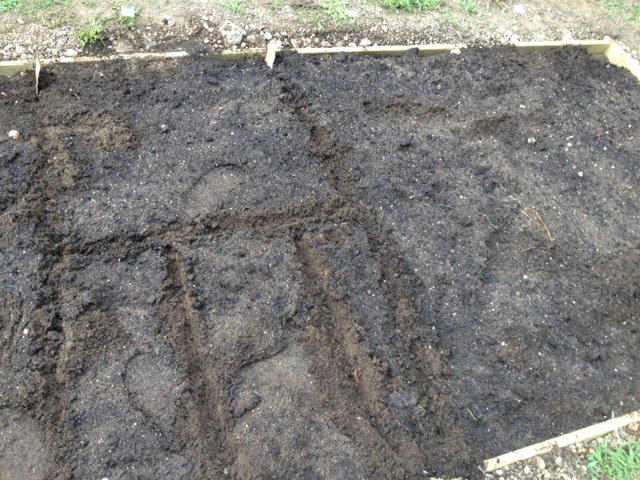
Step 5: Fill Your Organic Raised Garden Box with Soil

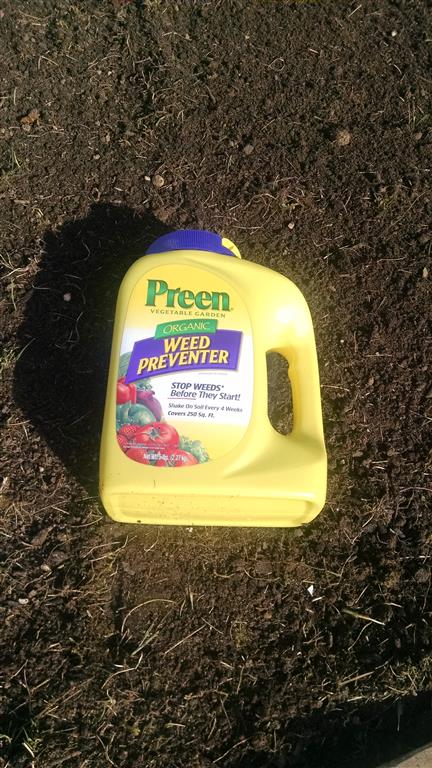
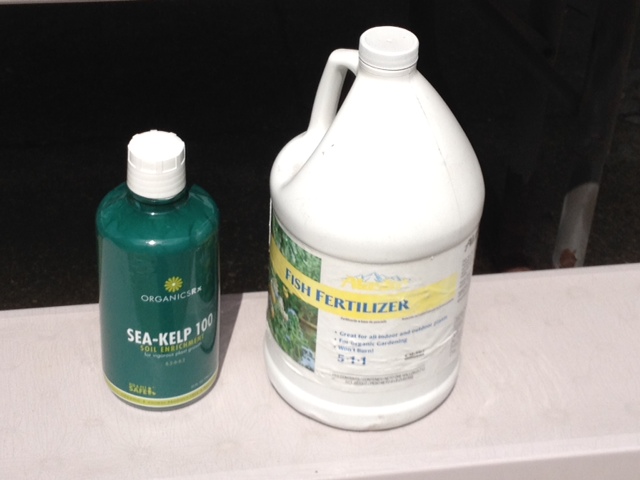
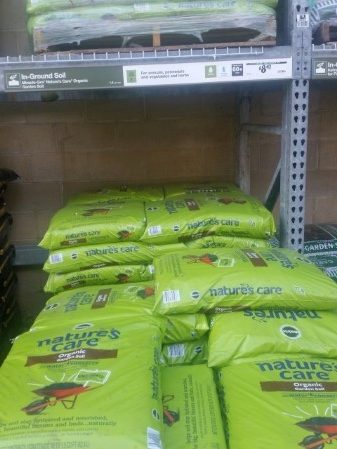
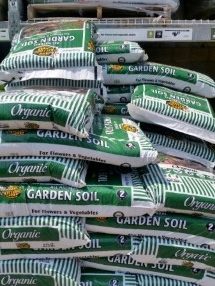
As you probably know, organic soil isn’t cheap. It costs about $8-$10 per 1.5 cubic foot bag. I decided to fill the box with about 20 cubic feet of soil and used a mix of top soil (at the bottom; about $1.25 per 1.5 cu feet) and organic soil (at the top). I probably spent about $75. I used a mix of these two organic soils:

Step 6: Plant Your Seeds

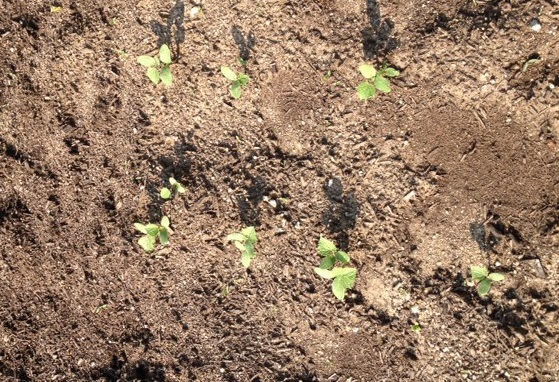
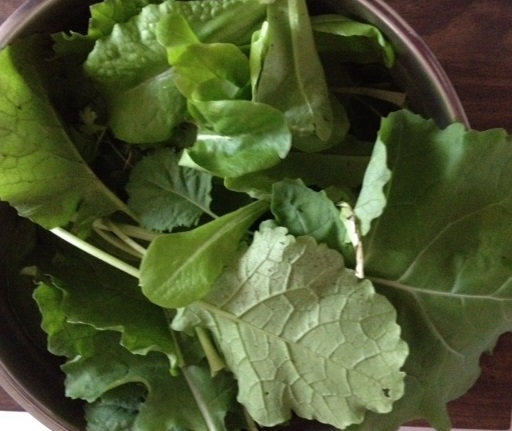
When you’ve finally done all of this work, planting your seeds will be the fun part. I planted a few cucumber and tomato seeds in a separate bucket will doing all the other steps so that they’d have a head start.

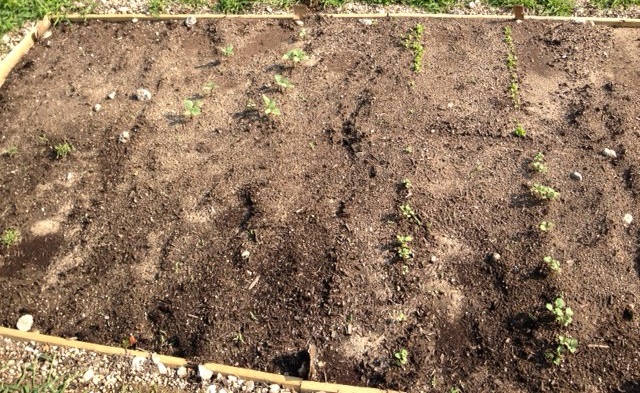
Step 7: Water and Tend to Your Garden

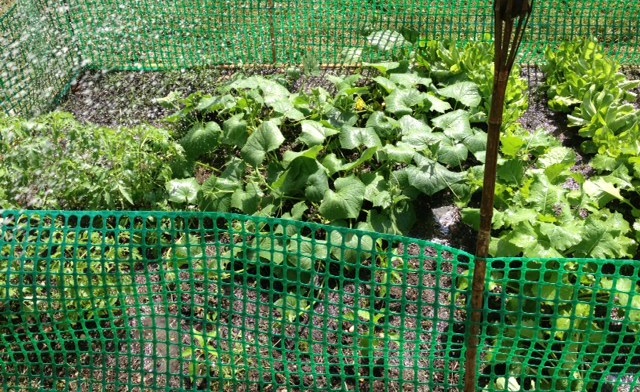
After you’ve finished setting up your raised organic garden box and planting your seeds, the next step is to set up automatic watering, surround it with rabbit fencing if needed, and tend to your plants.

Enjoy!

Share this:

  • Click to share on X (Opens in new window) X
  • Click to share on Facebook (Opens in new window) Facebook
  • Click to share on Pinterest (Opens in new window) Pinterest
  • Click to share on Tumblr (Opens in new window) Tumblr
  • Click to share on LinkedIn (Opens in new window) LinkedIn
  • Click to email a link to a friend (Opens in new window) Email
  • Click to print (Opens in new window) Print
  • More
  • Click to share on Reddit (Opens in new window) Reddit
  • Click to share on Pocket (Opens in new window) Pocket

Filed Under: Yard Work & Gardening Tagged With: gardening tips, organic garden

Review: Preen Organic Vegetable Garden Weed Preventer

June 4, 2016 By LovingOurHome.com Leave a Comment

I created a row garden this year with a wide array of veggies, including tomatoes, cucumbers, onions, collard greens, kale, spinach and potatoes. I’ve made the commitment to grow organic, but it can be difficult to maintain a large row garden like mine with all the weeds growing so fast. I looked for an organic weed preventer and I found a product called Preen Organic Vegetable Garden Weed Preventer. I decided to sow it into the soil before planting seeds (it’s also serves a fertilizer).

Preen Organic Vegetable Garden Weed Preventer

Benefits
• it’s affordable at around $15 for a 5 lb container that covers 250 sq ft
• it’s advertised to prevent weeds from growing in the garden and fertilize the soil
• it’s easy to use, no mixing required — just sprinkle and sow it into the dirt
• 1 application is supposed to last for up to 3 months
• can be applied to the soil in the summer, spring and fall

I didn’t see weeds starting to make their appearance in my garden until about a month after using the Preen Organic Vegetable Garden Weed Preventer. So while it worked for a while, it didn’t last in my garden for the 3 months as advertised. However, I might give it another application soon to help keep weeds at bay for another month.

I’d give this product a rating of 3 stars out of 5.

Growing a garden is truly a labor of love. To harvest and eat vegetables that I know grow free of chemicals +\or pesticides is an awesome feeling. However, if you can, you should cut out unnecessary chores whenever possible. I recommend Preen Organic Vegetable Garden Weed Preventer to organic gardeners who need something to help keep their weeds at bay.


Posted by Jade

Share this:

  • Click to share on X (Opens in new window) X
  • Click to share on Facebook (Opens in new window) Facebook
  • Click to share on Pinterest (Opens in new window) Pinterest
  • Click to share on Tumblr (Opens in new window) Tumblr
  • Click to share on LinkedIn (Opens in new window) LinkedIn
  • Click to email a link to a friend (Opens in new window) Email
  • Click to print (Opens in new window) Print
  • More
  • Click to share on Reddit (Opens in new window) Reddit
  • Click to share on Pocket (Opens in new window) Pocket

Filed Under: Things That Make Life Easier, Yard Work & Gardening Tagged With: gardening reviews, organic garden, organic gardening, preen weed preventer, product reviews, reviews, weed prevention

My First Organic Garden: Tips, Pics & Motivation for the First Time Vegetable Gardener

March 19, 2015 By LovingOurHome.com 1 Comment

When I was a young girl my father had a huge backyard garden. I didn’t understand the big appeal of the garden back then, mostly because I had to spend so many weekends in the hot sun helping to pull weeds! My Dad always had a great yield of tomatoes, cucumbers and other delicious greens.

 
One day last year on a whim, I decided to start my own little vegetable garden. I wanted to do something outdoors so that I would have more of an excuse to enjoy the sunshine instead of staying inside all of the time in front of a computer screen. I knew absolutely nothing about gardening, so I winged it mostly.


This began my love of gardening. Although I started planting VERY late in the season (the last week of July) I got the most beautiful yield of cucumbers, greens, buttercrunch lettuce and carrots. I am now excited about the prospect of starting another one when the weather is just right.


So if you are even remotely interested in gardening as a first-timer, here are the steps I took to get mine started. I may not be an expert just yet, and am still studying the best methods, but this is what worked for me. If you’re a first time organic gardener, just start small with a garden sized at about 5′ x 8′ — you can always expand it later.
Things you’ll need:


– an area of land that gets plenty of direct sunlight
– organic soil in a bag
– garden tools (including a good rake)
– soil sifter (keep reading for more on that)
– heirloom garden seed pack
– long wooden planks
– garden fence (green plastic)
– tall spikes
– staple gun
– fish fertilizer or sea kelp fertilizer or both (organic)
– garden feeder that can be attached to a hose (you can use the Miracle Gro feeder but dump the blue stuff inside first and clean it).
– a positive attitude


1. Prepare the soil.
The best preparation for good work tomorrow is to do good work today.
– Elbert Hubbard
startThe first and probably most time consuming step for me was preparing the soil and the area of the garden. I purchased a few bags of organic garden soil and one bag of miracle gro soil (whether or not a garden can still be considered 100% organic when using a Miracle Gro product is up for debate–I used the soil in a bag but not the chemical fertilizer that they sell).


sifter2The next thing I had to do was sift the soil to get rid of all the rocks and pebbles. This took a while and plenty of elbow grease. I was amazed to learn that my local home improvement stores did not have a sifting machine or tool in stock, so I had to fashion one by attaching mesh wire to two pieces of wood (I’ve since learned that there are a few options available online). I attached this primitive tool to the top of a wheelbarrow, scooped dirt on top and sifted it by hand. This took about two days to complete. I just put my gardening hat on, put my headphones on, turned on a good audiobook and got to work.


Much like life, you can’t have consistent growth without a proper foundation. So I knew this soil had to be just right.


Good soilAfter I finished sifting the dirt, I had the cleanest, smoothest patch of soil I had ever seen. The hard work was worth it. It was silky smooth, loose and fell right through my hands. (Keep in mind that if it rains you should cover the area unless you want to wait days for the soil to dry again.)


Next, I added the soil I purchased from my home improvement store to the silky soil and mixed it all together thoroughly with a garden rake. It looked fresh, dark and ready for planting.


The next step was to cordon off the area so that it was a well-defined garden. I purchased large cut wooden planks from Home Depot and hammered them into the ground around the garden. I also purchased green plastic garden fencing (comes in a roll at the store) and spikes to use later on to protect the garden from small animals. I also used the rocks I sifted from the soil as decoration around the garden area.


2. Planting the seeds.


Sow a thought and you reap an action; sow an act and you reap a habit; sow a habit and you reap a character; sow a character and you reap a destiny.
– Ralph Waldo Emerson
start2After adding the wooden planks around the garden I knew it was time for planting seeds. I purchased an heirloom seed pack from Amazon, which I highly recommend. They’re called “survival seeds” because you can harvest and replant them over and over into eternity (non-GMO). The pack I bought has a wide variety of vegetable seeds including carrots, tomatoes, lettuce, peppers, onions, cilantro, broccoli and more. I drew a plan on a piece of paper and divided the area of the garden into clearly defined sections. I followed the directions on each seed pack, being careful to leave plenty of space between each line of seeds. I then used my hands to carefully cover up each line of seeds with my hands.


3. Bless the garden.


When you focus on being a blessing, God makes sure that you are always blessed in abundance.
– Joel Osteen
Some may think this step isn’t necessary, but I personally think it was crucial to the success of my little garden — especially being that I started planting seeds so late in the summer. I asked Divine Providence and my late, beloved father (who had recently passed) to watch over my garden. I thought positive thoughts about my garden and imagined all of the delicious, healthy vegetables it would grow.


4. Water and wait.


Gardening requires lots of water — most of it in the form of perspiration. – Lou Erickson
The next step is to water your newly planted garden daily and wait. I set up an automatic timer to run the water twice per day over my garden, I believe it was once in the morning and once in the afternoon for about 45 minutes or longer. It took just a week for me to start seeing pretty little green sprouts and I was so excited! Only weeks later I had some plants that were ready for harvesting (namely the buttercrunch lettuce and greens).


5. Protect your garden.


A blessing is a circle of light drawn around a person to protect, heal and strengthen.
– John O’Donohue
sprouts
Once you start to see plant life growing in your organic garden it’s time to add your garden fence around it. Add tall spikes at all corners and at the mid-points, then wrap it with the green plastic fencing. Staple the fencing to your wooden planks and use string to tie it to each spike.

sprouts2

It’s also a good idea to have some type of natural protectant from flying and crawling pests for your garden. I purchased Neem oil (bugs don’t like it) and added a few droppers full to a spray bottle of water. Just shake it up and spray it on your garden regularly to keep the bugs away. I also put baking soda on the ground around my lettuce and cucumbers when I saw that snails were crawling in and munching on the leaves. It’s supposed to help keep those types of bugs away.


garden3

If you really want to keep all sorts of animals away from your garden, there’s a product sold in stores that smells like fox urine. It has to be applied in certain areas of the yard to ward off woodland creatures — just follow the instructions perfectly. I didn’t use it, but that’s up to you and what you feel is necessary.


6. Feed it and love it.


It is not how much you do, but how much love you put in the doing.”
– Mother Teresa
Organic fertilizerYou’re ideally supposed to feed your growing garden at least once per week. I was dedicated to keeping my garden organic, so I researched natural plant food. I purchased Fish fertilizer and Sea Kelp fertilizer for my garden. There’s also a product that combines the two. Every week, I filled up my spray bottle (it attaches to a hose) with a mixture of the two products and fed my garden while humming a tune or listening to my audiobooks. I loved every bit of it. I loved my garden and I believe that is why it grew so beautifully.


7. Harvest and enjoy.


With every deed you are sowing a seed, though the harvest you may not see.
– Ella Wheeler Wilcox
first cucumberThe last and possibly most satisfying step of growing your first organic vegetable garden is enjoying the fruits. I was so excited when my first cucumber appeared — it seemed to have grown overnight, which I have since learned is common with cucumbers. It was so fresh and delicious.


Then came the first orange carrots — crisp and sweet. I had plenty of lettuce Organic carrotto use in my salads and greens to make with meals during the week. I call it “healing food” because it is so rich in healthy vitamins, nutrients and love that you put in it. Soak the veggies and wash them very good before eating. There were also instructions on my seed pack for how to save the seeds for future planting.


green2I hope that this fairly long article has helped you get motivated to start your very own first time organic garden. I can’t believe I waited until now to get started — gardening is so rewarding. I don’t know why, but for some reason I never thought that I could ever grow my own vegetables. That’s nonsense — anyone with patience and the right tools can have a green thumb. It was a learning experience on so many levels and a testament to how changing our thoughts can change our lives for the better. Gardening gives me peace and serenity. It also gives me something special to look forward to each day.


May you be encouraged to start your first organic garden in your backyard or a community garden this spring or summer. Happy planting!


Love Lynn
Lynn is an author of motivational and dating advice books. She’s also a transformational blogger who continually “sows seeds” of positivity to her followers and readers. She is a guest blogger for LovingOurHome.com .

Share this:

  • Click to share on X (Opens in new window) X
  • Click to share on Facebook (Opens in new window) Facebook
  • Click to share on Pinterest (Opens in new window) Pinterest
  • Click to share on Tumblr (Opens in new window) Tumblr
  • Click to share on LinkedIn (Opens in new window) LinkedIn
  • Click to email a link to a friend (Opens in new window) Email
  • Click to print (Opens in new window) Print
  • More
  • Click to share on Reddit (Opens in new window) Reddit
  • Click to share on Pocket (Opens in new window) Pocket

Filed Under: Motivation and Self Help, Yard Work & Gardening Tagged With: gardening, love lynn, my first garden, organic garden

Why You Should Consider Growing Your Own Vegetables

July 10, 2014 By LovingOurHome.com Leave a Comment

Feeding yourself and/or a family healthy produce is very challenging, these days. The worst, is that the cheaper the food, the more unhealthy it is for you. With the prices of quality produce consistently on the rise, growing your own produce has become popular by demand. The only question you must ask yourself is what kinds of produce do you and your family consume and enjoy the most. Once that question is answered you now know what to grow in your produce garden.

I personally like knowing exactly where my vegetables came from. When I visit my local supermarket, I have absolutely no idea where there produce comes from and what kind of soil and fertilizers were used to grow it. I don’t know about you but this gives me the “willies.” More people are now eating healthier and smarter. What would be better than having a garden full of wholesome vegetables in your backyard?

Parents can convince their children to enjoy the pleasures of growing food. Another fantastic outcome will be that your kids will be more likely to eat their vegetables because they helped grow them. They will always remember the effort and dedication it took to grow a quality produce garden. Thus, as adults choosing to continue to eat quality produce, only.

Tips for Growing Your Own Vegetables

– It’s important to remember that there are certain times of year that are best to begin your garden. Do some research on what months are best to start growing the vegetables you want.

– Choose an area in your yard that gets plenty of sunlight with minimal shade.

– The size of your garden should depend on how many types of vegetables you want to grow. On a piece of paper map out what you want to grow.

– Prepare your plot. Use a shovel and a pitch fork to remove the grass,rocks, debris and any roots in that area, then even out the soil with a rake. I highly recommend that you visit your local gardening center to purchase nutrient rich soil to mix with your current soil. Ask a lot of questions to ensure that you purchase the correct soil for your garden. I personally, prefer to use organic soil because it does not contain any harmful chemicals or additives. Mix the new soil with your existing soil with a rake. Make sure that the soil has no clumps and is even.

– While at the garden center ask a knowledgeable garden expert about purchasing the best seeds to plant. They are the ones who will know if the seeds have been genetically altered.

– Follow your map to place the seeds in the spots you chose and don’t forget to water the area when done. Make sure that your garden receives proper watering daily, to help the seeds grow.

When done properly, your garden, depending on its size, can produce food that can be bagged, frozen or canned that you and your family can enjoy for months to come.

Join with me and countless other home farmers to help end unnecessary obesity and illnesses that are brought on by an unhealthy diet. Let’s start with the vegetables!!!

Posted by Eve


Share this:

  • Click to share on X (Opens in new window) X
  • Click to share on Facebook (Opens in new window) Facebook
  • Click to share on Pinterest (Opens in new window) Pinterest
  • Click to share on Tumblr (Opens in new window) Tumblr
  • Click to share on LinkedIn (Opens in new window) LinkedIn
  • Click to email a link to a friend (Opens in new window) Email
  • Click to print (Opens in new window) Print
  • More
  • Click to share on Reddit (Opens in new window) Reddit
  • Click to share on Pocket (Opens in new window) Pocket

Filed Under: Yard Work & Gardening Tagged With: growing your own vegetables, home garden, organic garden, vegetable gardening

Primary Sidebar

Categories

  • Beauty Tips
  • Cat Central
  • Dating, Love and Relationships
  • Food & Recipes
  • Health and Wellness
  • Home Buying or Renting
  • Home Care and Cleaning
  • Home Decor and Design
  • Home Equipment and Appliances
  • Home Finance and Budgeting
  • Home Improvement
  • Home Tips
  • Life Thoughts by Jas
  • Light Simple
  • Motivation and Self Help
  • Parenting Advice & Tips
  • Parties, Events, Holidays, Fun
  • Pest Control
  • Pets
  • Product Reviews
  • Quick Tips
  • Quotes
  • Shopping Advice
  • Special Deals
  • Summer Products
  • The Funnies
  • Things That Make Life Easier
  • Uncategorized
  • Yard Work & Gardening

Copyright © 2025 · Genesis Sample on Genesis Framework · WordPress · Log in