• Skip to primary navigation
  • Skip to main content
  • Skip to primary sidebar
  • Home
  • Posts
    • Home Care and Cleaning
    • Home Decor and Design
    • Yard Work & Gardening
    • Food & Recipes
    • Pets
    • Health and Wellness
    • Motivation and Self Help
    • Home Tips
    • Parenting Advice & Tips
    • Parties, Events, Holidays, Fun
    • Things That Make Life Easier
    • Home Finance and Budgeting
    • Shopping Advice
  • Cat Central
  • Share a Home Tip
  • Got a Question?

Loving Our Home | Home Tips, Advice, and Easy Recipes

Simple Home Tips and Solutions

Food & Recipes

Evelyn’s Homemade Jamaican Beef Patties

August 14, 2014 By LovingOurHome.com Leave a Comment

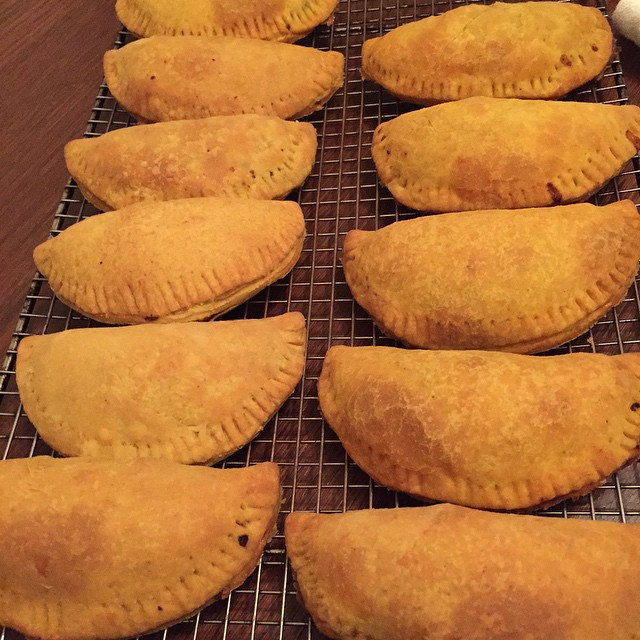
One day, I had a hankering for Jamaican beef patties. Then, I remembered, that some years back, a Jamaican friend of mine gave me her family’s recipe. So, I searched my recipe box to find it. I was thrilled that I found the recipe titled “Nanny’s Beef Patty.” The instructions were in two parts: 1 part beef filling and 1 part dough. I made a few adjustments to satisfy my taste buds. If you make this recipe correctly, you will never look at a store bought beef patty with the same affection. IRIE!!!!

What Jamaican Beef Patties Look Like

Ingredients:

Beef Filling

1 LB Lean Ground Beef
2-3 Large Cloves of Garlic, Finely Chopped
1/2 Cup of Chicken Stock
1 Medium Onion, Finely Chopped
1/2 Cup of Unseasoned Bread Crumbs
1/2 Teaspoon Salt
1/4 Teaspoon Pepper
3/4 Teaspoon of Jamaica Curry Powder
1 Teaspoon of Allspice
1 Teaspoon of Thyme ( dry )

Pastry

4 Cups White All Purpose Flour
2/3 Cups Water
1 Teaspoon Jamaican Curry Powder
3/4 Cup of Butter (room temperature )
1 Teaspoon Salt

Instructions:

(Make beef filling first because it needs to cool off before you put it inside pastry dough.)

Pre-Heat a Large Sauce Pan on Medium High Heat
Add Ground Beef
Add Chopped Onion
Add Chopped Garlic ( add garlic last, so that it doesn’t burn )

Brown the ground beef until thoroughly cooked along with the onion and garlic.
Make sure to properly break up ground beef, so there are no chunks of meat in the sauce pan.
When meat, onion and garlic is done, remove from heat and drain excess oil from sauce pan.
Return sauce pan to stove with the heat setting on low.
(The reason why I don’t add the other ingredients to the meat while cooking, is because I feel you lose a certain amount of flavor when the seasonings are added to the meat before you remove the excess oil from sauce pan.)
Now you can add your other ingredients.

Add the remaining ingredients to the sauce pan and combine.
Taste the mixture to ensure that it contains enough salt.
Sauté mixture for about 3 minutes.
Remove from heat, without the lid.

Making the Pastry 

In a large mixing bowl, add all your dry pastry ingredients including the butter.
Use your fingers to incorporate the butter with the flour and seasonings.
Slowly add water to mixture.
Mixture should look crumbly, not wet.
Make the dough into a ball and place onto a lightly floured surface. ( so dough doesn’t stick to surface )
Kneed with the palm of your hand for about 2 minutes.
Return dough to bowl and tightly cover with plastic wrap.
Allow the dough to rest for about 20 minutes, while the beef filling continues to cool.

After the dough has rested, preheat oven to 400 degrees.

Remove dough from bowl and place on a floured surface. Make the balls a little bigger than a golf ball.
Take floured rolling pin and roll dough to make a thin oval shape. (Doesn’t have to be perfect, will taste great anyway)
Repeat the steps for each dough ball made.

On a large non stick baking sheet, place 1 dough oval on the baking sheet and fill it with approximately 1/4 cup of beef filling in the middle of the pastry. (Filling amount depends on the size of your pastry, so add or subtract filling as needed.)

Fold dough in half, to make a half moon.
Crimp the edges together to ensure filling is kept inside of the pastry.

Repeat steps, until all pastries are made on the baking sheet.

Place baking sheet in the oven, on the middle rack.

Cook for approximately 20-30 minutes or until golden brown. (Check your Jamaican beef patties after 15 minutes)

Enjoy!!

Posted by Eve


Photo courtesy Flickr/sixteenmilesofstring

Share this:

  • Click to share on X (Opens in new window) X
  • Click to share on Facebook (Opens in new window) Facebook
  • Click to share on Pinterest (Opens in new window) Pinterest
  • Click to share on Tumblr (Opens in new window) Tumblr
  • Click to share on LinkedIn (Opens in new window) LinkedIn
  • Click to email a link to a friend (Opens in new window) Email
  • Click to print (Opens in new window) Print
  • More
  • Click to share on Reddit (Opens in new window) Reddit
  • Click to share on Pocket (Opens in new window) Pocket

Filed Under: Food & Recipes Tagged With: homemade beef patties, jamaican beef patties, recipes

Ways to Keep Food Cold Outside

August 7, 2014 By LovingOurHome.com Leave a Comment

Here are a few simple ways to keep your food cold outside when throwing a party, barbecue or picnic!

When you are having an outdoor event in the hot summer sun, it can be a challenge to keep your cold foods cool. There are a few ways that you can go about maximizing the time that your cold food items stay at just the right temperature for the duration of your gathering. Regardless of the option you choose, make sure that you keep all of your cold items close to each other and far away from your hot food.

Plastic Cooler

Consider investing in a large heavy-duty plastic cooler like the Coleman Xtreme Cooler if you frequently have outdoor parties in the heat. These coolers can keep ice and food cold for about five days in very hot weather, like a small temporary refrigerator. They cost about $40 to $100 each depending on the size. Be sure to get the largest cooler available and place it on a short table. Place the food on top and allow your guests to help themselves.

“Ice Sandwich”

Purchase large bowls that are large enough to fit circular plates and bowls that will hold your cold food. Fill the bowls with ice and nestle the dishes inside of them. For example, you can have a large bowl, then ice in the middle, then a smaller bowl on top-like an ice sandwich.

Inflatable Kiddie Pool

Buy a small square inflatable kiddie pool. Fill it up with ice and nestle your bowls, plates, and trays inside. This should take care of most if not all of your cold food items. Wait until the very moment your guests start to arrive before filling the pool with ice and adding your food items. This idea is probably best for a kids’ birthday party or pool party. For a more classy, adult outdoor event, get an inflatable serving bar instead.

Dry Ice Pellets

Buy dry ice pellets for your party. These pellets can keep food cool for an extended period of time (sometimes up to two or three days). Insert the pellets in plastic bags-they should not come into directly contact with your food. Still, make sure the dry ice is “food grade” meaning that it should be reasonably safe to have in the presence of food.

Deep Freezer for Ice Cream

Position a deep freezer directly outside the house (if this is outside of a home) and run an extension cord inside or to an outdoor outlet to keep it running. Place your ice cream and other frozen treats inside of the freezer for the party. Make sure you put the freezer outside hours before the party so that it will have time to get ice cold.

As you can see there is more than only way to keep food cold outside for your upcoming outdoor event. Choose the option that best fits your needs and the theme of your party.

Share this:

  • Click to share on X (Opens in new window) X
  • Click to share on Facebook (Opens in new window) Facebook
  • Click to share on Pinterest (Opens in new window) Pinterest
  • Click to share on Tumblr (Opens in new window) Tumblr
  • Click to share on LinkedIn (Opens in new window) LinkedIn
  • Click to email a link to a friend (Opens in new window) Email
  • Click to print (Opens in new window) Print
  • More
  • Click to share on Reddit (Opens in new window) Reddit
  • Click to share on Pocket (Opens in new window) Pocket

Filed Under: Food & Recipes, Things That Make Life Easier Tagged With: barbecues, food cold outside, ice cream parties, keep food cold, outdoor parties, picnics, pool parties

Meatball Stroganoff With Egg Noodles

August 2, 2014 By LovingOurHome.com Leave a Comment

This is a delicious recipe for Meatball Stroganoff with Egg Noodles that is easy to make any day of the week. My family truly enjoys helping me in the kitchen to make this recipe, so they can eat that much faster.

A picture of a delicious Stroganoff dish.

Ingredients

3 cups of egg noodle ( size of your choice )
1 cup of evaporated milk
1 cup of sour cream
1 1/2 cups of beef broth
Salt and pepper (to taste)
1 pound of ground beef (80/20 mix)
1/4 teaspoon of allspice
1 tablespoon of dry oregano
1 tablespoon of dry parsley
1 teaspoon of basil
2 tablespoons of extra virgin olive oil

Instructions

In a large pot add 8 cups of water
Add 2 teaspoons of salt to water
Bring to a rapid boil
Add noodles
Cook noodles for 5-7 minutes (you want the noodles “al dente”)
Drain cooked noodles
Set aside

In a large bowl add

Ground beef
Oregano
Parsley
All spice
Basil
Salt and pepper

Mix together with either your hands or a potato masher

Preheat a large sauce pan on medium heat and add the olive oil
While pan is heating, form medium sized meatballs and place into pan to brown
Make sure all sides are browned
When meatballs are fully cooked remove meatballs from pan

Deglaze the pan by pouring beef broth into pan
Bring broth to a simmer
Slowly add milk, sour cream and stir together
Simmer on medium high heat until sauce is reduced (sauce should thicken)
Return meatballs to sauce
Add egg noodles
Add salt & pepper to taste
Toss with tongs to coat egg noodles with sauce

Place cover on pan and cook for 5 minutes

Serve your Meatball Stroganoff with Egg Noodles while hot.

Enjoy!!!!

Posted by Lorraine

Photo courtesy Flickr/benketaro

Share this:

  • Click to share on X (Opens in new window) X
  • Click to share on Facebook (Opens in new window) Facebook
  • Click to share on Pinterest (Opens in new window) Pinterest
  • Click to share on Tumblr (Opens in new window) Tumblr
  • Click to share on LinkedIn (Opens in new window) LinkedIn
  • Click to email a link to a friend (Opens in new window) Email
  • Click to print (Opens in new window) Print
  • More
  • Click to share on Reddit (Opens in new window) Reddit
  • Click to share on Pocket (Opens in new window) Pocket

Filed Under: Food & Recipes Tagged With: Egg Noodles, food, Meatball Stroganoff, recipes

Healthy Homemade Strawberry Banana Muffins

August 1, 2014 By LovingOurHome.com Leave a Comment

This recipe for strawberry banana muffins is super quick and easy. One day I had a hankering for something sweet. However, I didn’t want to eat an unhealthy store bought treat to satisfy my craving. I made this recipe with fiber cereal, fruit and Truvia (a healthier sweetener). I hope you enjoy my recipe.

Ingredients

11/2 cups of crushed fiber or bran cereal
1/2 cup of Unbleached flour
1 egg
1 cup coconut milk
3/4 cup diced strawberries
1 ripe banana
1/2 teaspoon of Celtic sea salt
1 tablespoon of baking powder
1 teaspoon of vanilla extract
1/2 cup of Truvia

Instructions

Preheat oven to 350 degrees

In a large mixing bowl, combine and mix dry ingredients
Flour
Cereal
Salt
Baking powder
Truvia

In a medium bowl, combine wet ingredients and whisk together
Egg
Coconut milk
Vanilla extract

Mash ripe banana with a fork and add to wet ingredients

Mix both wet and dry ingredients in the large bowl

Gently add and fold dice strawberries to the mix. (Mix should be lumpy)

Grease muffin pan with a non stick cooking spray or use cupcake baking cups

Do not fill to top

Bake 20-30 minutes

The strawberry banana muffins are done when you can place a knife in the middle of a muffin and knife comes out clean.

Enjoy!!!!

Share this:

  • Click to share on X (Opens in new window) X
  • Click to share on Facebook (Opens in new window) Facebook
  • Click to share on Pinterest (Opens in new window) Pinterest
  • Click to share on Tumblr (Opens in new window) Tumblr
  • Click to share on LinkedIn (Opens in new window) LinkedIn
  • Click to email a link to a friend (Opens in new window) Email
  • Click to print (Opens in new window) Print
  • More
  • Click to share on Reddit (Opens in new window) Reddit
  • Click to share on Pocket (Opens in new window) Pocket

Filed Under: Food & Recipes, Health and Wellness Tagged With: food, healthy food, healthy treats, muffin recipe, recipes, strawberry banana muffins

Homemade Hummus

July 25, 2014 By LovingOurHome.com Leave a Comment

As I get older, I am finding that I am beginning to try new foods. For years, my friends have been talking about how tasty hummus with tortilla chips is. At my age, I now prefer to make my snacks at home because of the harmful ingredients found in store bought snacks. So I have come up with my own recipe. I compiled this recipe from my friends different family recipes. I picked and chose the ingredients I wished to combine to my desired pallet.

Ingredients:

2 cans of Chick Peas (garbanzo beans)
1/2 cup of Tahini sauce ( found in most supermarkets)
1 teaspoon of Cumin
1-2 pinches of Cayenne Pepper
2 teaspoons of fresh minced Garlic
1/2 teaspoon Salt
1 tablespoon of Extra Virgin Olive Oil
1/3 teaspoon Lemon Juice
1/2 cup of Water
1/4 cup of Pie Nuts (garnish)
1 Sprig of Parsley or Cilantro (Garnish)

Instructions ( most ingredients will be put in a food processor):

One of my favorite Tahini sauces.

Open 2 cans of chick peas and drain excess water
Place chick peas into a large food processor
Pulse chick peas until chunky
Add tahini sauce to processor
Pulse until smooth
Add remaining ingredients-
Lemon juice
Cumin
Cayenne
Minced garlic
Salt
Extra Virgin Olive Oil
Pulse until all ingredients are very well blended
Taste- add more salt if needed
Hummus should have a thick consistency (if thinner is preferred add more water and extra virgin olive oil)
Remove Hummus and place in storage container
Place in refrigerator for 1 hour to allow flavors to combine

I served this with my friends at a party and received rave reviews. I have even gone so far as to using it to replace mayonnaise on a sandwich. I must admit that it was not bad. Try it!!

ENJOY!!!!!


Posted by Lorraine

Share this:

  • Click to share on X (Opens in new window) X
  • Click to share on Facebook (Opens in new window) Facebook
  • Click to share on Pinterest (Opens in new window) Pinterest
  • Click to share on Tumblr (Opens in new window) Tumblr
  • Click to share on LinkedIn (Opens in new window) LinkedIn
  • Click to email a link to a friend (Opens in new window) Email
  • Click to print (Opens in new window) Print
  • More
  • Click to share on Reddit (Opens in new window) Reddit
  • Click to share on Pocket (Opens in new window) Pocket

Filed Under: Food & Recipes Tagged With: food, homemade, hummus, recipes

Spanish Style Steak with Rice and Beans

July 25, 2014 By LovingOurHome.com Leave a Comment

I have been preparing this meal for my family for many years. This Spanish Style Steak recipe may look complicated, but really it is not. It is mainly about having the correct seasonings. Once you or your family taste this recipe it will become a meal that is asked for weekly. This recipe will feed a family of 4, graciously!!!

Ingredients:

3 to 4 lbs Chuck Eye Steak (or steak of your choice)
1 large Sweet Onion
1/2 large Green Pepper
3 teaspoons Adobo Seasoning
1 can Red Kidney Beans
1 large Garlic Clove
1 cup Long Grain Rice
2 tablespoons of oil ( oil of your choice)

Instructions:

Rice

Place 2 cups of water in a medium sized pot
Bring to rapid boil
Add 1 teaspoon of Adobo into boiling water
Add 1 cup of rice
Add 1 tablespoon of oil (prevents rice from sticking together)
Stir rice, oil and seasonings together
Bring back to a boil
Cover rice with lid and put heat on low
Allow to cook 20 minutes (do not remove lid while rice is cooking)

Beans

Open 1 can red kidney beans (or beans of your choice)
Pour into sauce pan on medium heat
Peel and coarsely chop garlic
Add garlic to beans
Stir and bring beans to a simmer then cover with lid for approximately 4-5 minutes
Turn heat off, leave the beans covered to allow them to stay warm

Steak, Onion, Pepper

In a large fry pan place 2 tablespoons of oil and set temperature to medium high
Slice onion and pepper into strips and place into fry pan
Toss/ coat onion and pepper in the fry pan
Cook until soft
Remove from pan, place on plate, put aside

Place heat on medium high and allow fry pan to get hot
Season steak on both sides with 2 teaspoons of adobo seasoning
Add steak to fry pan, add onions and peppers also
Fry steak for 3-4 minutes on each side (depending on the thickness of your steak)

My family and I enjoy having this meal with a side salad, that consists of lettuce, feta cheese, sliced onion, tomatoes with a vinaigrette dressing.

Salud!!!!

Share this:

  • Click to share on X (Opens in new window) X
  • Click to share on Facebook (Opens in new window) Facebook
  • Click to share on Pinterest (Opens in new window) Pinterest
  • Click to share on Tumblr (Opens in new window) Tumblr
  • Click to share on LinkedIn (Opens in new window) LinkedIn
  • Click to email a link to a friend (Opens in new window) Email
  • Click to print (Opens in new window) Print
  • More
  • Click to share on Reddit (Opens in new window) Reddit
  • Click to share on Pocket (Opens in new window) Pocket

Filed Under: Food & Recipes Tagged With: arroz y frijoles, food, rice and beans, spanish recipes, spanish style steak

  • « Go to Previous Page
  • Page 1
  • Interim pages omitted …
  • Page 13
  • Page 14
  • Page 15
  • Page 16
  • Go to Next Page »

Primary Sidebar

Categories

  • Beauty Tips
  • Cat Central
  • Dating, Love and Relationships
  • Food & Recipes
  • Health and Wellness
  • Home Buying or Renting
  • Home Care and Cleaning
  • Home Decor and Design
  • Home Equipment and Appliances
  • Home Finance and Budgeting
  • Home Improvement
  • Home Tips
  • Life Thoughts by Jas
  • Light Simple
  • Motivation and Self Help
  • Parenting Advice & Tips
  • Parties, Events, Holidays, Fun
  • Pest Control
  • Pets
  • Product Reviews
  • Quick Tips
  • Quotes
  • Shopping Advice
  • Special Deals
  • Summer Products
  • The Funnies
  • Things That Make Life Easier
  • Uncategorized
  • Yard Work & Gardening

Copyright © 2025 · Genesis Sample on Genesis Framework · WordPress · Log in