• Skip to primary navigation
  • Skip to main content
  • Skip to primary sidebar
  • Home
  • Posts
    • Home Care and Cleaning
    • Home Decor and Design
    • Yard Work & Gardening
    • Food & Recipes
    • Pets
    • Health and Wellness
    • Motivation and Self Help
    • Home Tips
    • Parenting Advice & Tips
    • Parties, Events, Holidays, Fun
    • Things That Make Life Easier
    • Home Finance and Budgeting
    • Shopping Advice
  • Cat Central
  • Share a Home Tip
  • Got a Question?

Loving Our Home | Home Tips, Advice, and Easy Recipes

Simple Home Tips and Solutions

Battered Fish and Shrimp with French Fries and Tartar Sauce

October 2, 2015 By LovingOurHome.com Leave a Comment

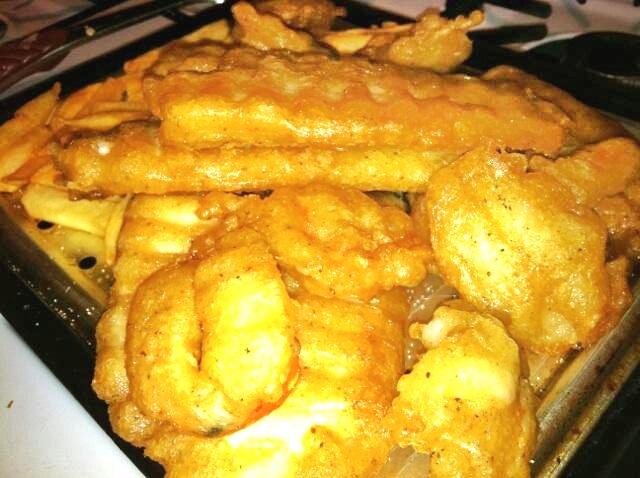
This simple recipe for Battered Fish and Shrimp with French Fries and Tartar Sauce is an awesome seafood dinner. It is packed with tons of flavor. A bonus is that the batter and tartar sauce are homemade, so you know exactly what’s in it. They consist of simple ingredients that you have in your refrigerator and pantry already.

 
Battered Fish and Chips
Ingredients

2 Lbs Skinless Fish Fillets (flounder, whiting, talapia, perch and cod are all OK to use for this recipe)
1/2 Lb Shrimp Peeled, Deveined And Butterflied
2 Cups Frozen French Fries

– Homemade Batter –
1 Cup Flour
1 Tablespoon Old Bay Seasoning
1/2 Cup Seltzer Water

– Homemade Tartar Sauce –
1/2 cup of mayonnaise
1/4 cup sweet relish
1/2 tablespoon of shredded carrot (optional)
A pinch of salt and pepper
Juice from 1/2 of a lemon (a whole lemon if you really like it tart)

Instructions

First, prepare your batter, by mixing flour, seasoning and seltzer water in a large bowl or dish. Batter should be thick enough to generously coat fish and shrimp. Next, in a large fry pan add the oil and place on medium high heat.

Now, fry your French fries until golden brown and place on a baking sheet. Place baking sheet in the oven on warm. Then allow the oil to reheat for two to three minutes. Meanwhile, coat fish fillets with batter on both sides. Carefully, place fish in the oil. Allow fish to cook for three minutes on each side until golden brown. Repeat this process to fry the shrimp. Remember that shrimp cooks faster than fish. Also, don’t forget to place fish and shrimp on a cooling rack to allow excess oil to drain.

Finally, combine the ingredients for your fresh tartar sauce and adjust ingredients as needed for taste. Place a dollop on the side and use it as a dip for your fish and shrimp.

Enjoy your Battered Fish and Shrimp with French Fries and Tartar Sauce!

Battered Fish and Chips
Posted by Eve

Share this:

  • Click to share on X (Opens in new window) X
  • Click to share on Facebook (Opens in new window) Facebook
  • Click to share on Pinterest (Opens in new window) Pinterest
  • Click to share on Tumblr (Opens in new window) Tumblr
  • Click to share on LinkedIn (Opens in new window) LinkedIn
  • Click to email a link to a friend (Opens in new window) Email
  • Click to print (Opens in new window) Print
  • More
  • Click to share on Reddit (Opens in new window) Reddit
  • Click to share on Pocket (Opens in new window) Pocket

Filed Under: Food & Recipes Tagged With: battered fish, battered shrimp, evelyns recipes, fish and chips, food, recipes, seafood recipes

Ideas for Leftover Juicing Pulp: Make Homemade Sausage!

September 27, 2015 By LovingOurHome.com Leave a Comment

Juicers: learn how to make homemade sausage with leftover juicing pulp.
* Warning, some of the pictures in this blog post are a little less than “appealing” but hey, we’re making sausage here! *
Homemade Sausage with Juicing Pulp
My very first try making homemade sausage with leftover juicing pulp. The flavor was good, but needed some more fat/oil to make it juicer.
I finally became a juicing convert after watching several food documentaries like “Hungry for Change” and the “Fat, Sick…” series featuring Joe Cross. The idea behind juicing is that when you have nutrients from vegetables and fruits in liquid form, it gets to your bloodstream quicker and starts to repair your cells. It’s like eating the nutritional value of a pound of veggies in one glass. I definitely feel an increased level of energy and mental clarity after juicing for just one month.
My Juicer
My Juicer
But one thing always bothers me a bit, and that is having to throw out so much pulp leftover from the juice. It’s high in fiber and should be used somehow.
One day as I was making my morning juice, I got the idea to use the pulp to make homemade sausage.The flavors of celery, cucumber, apple, pear and ginger would taste interesting with pork or turkey. It would also make for an even healthier breakfast.
So I went on a hunt for supplies and picked up a package of ground turkey and a small package of pork sirloin steaks. I also needed the casing to make the sausage with, and found it at a nearby butcher shop. My friendly neighborhood butcher gave me a few tips for how to make your own sausage using a funnel.
So here is the process that I used from beginning to end. I’ve included a few adjustments that I would recommend that I didn’t do in my first batch to make the sausage more moist (mine came out tasty, but a bit dry).
Here is what I normally juice. So the pulp will all end up in my sausage. Ginger root, cucumber, celery, pears, apples and greens. I added a bit of spinach this time also.
juicing veggies fruits
Ingredients
1 package of 80/20 ground pork, turkey or chicken (I used lean turkey my first time around, but I definitely wouldn’t recommend you use turkey if you like a juicy, flavorful sausage)
1 cup of your leftover juicing pulp
7-10 Garlic Cloves
2 Tbs of Salt
1 Tbs of Fennel seeds
1 Tbs of crushed black pepper (you want them a bit courser than the fine pepper that comes in a shaker)
Half a teaspoon of red pepper flakes *optional (if you like your sausage a little hot)
About 1/4 cup of olive oil *optional (if you have a meat with high fat content like pork, the oil probably isn’t necessary)
A few feet of pork sausage casing (find it at a butcher shop or online here – there’s also a casing available that is made of beef)
A large kitchen funnel (you can find one at the dollar store hanging up among kitchen items – there are also affordable sausage makers available if you prefer to make this process easier)
ingredients for sausage made with juicing pulp
Instructions
Sort through the juicing pulp and pull out the big pieces that didn’t break down enough in the juicing process. Put them into a food processor along with your garlic cloves and process for about a minute.
sausage mix with juicing pulp
In a large bowl, combine your juicing pulp, the package of ground meat and the mixture from the good processor along with all other ingredients. Mix it all together thoroughly with your fingers. Check the consistency and add more olive oil if needed to make it more moist.
sausage mixture (Small)
Grab your funnel and attach the open end of the sausage casing to the tube (see picture). Measure off about 8 inches more of the casing and cut it with scissors. Tie a knot on the other end of the sausage casing.
casing and funnel (Small)
sausage casing (Small)
Start stuffing your meat mixture into the open side of the funnel. Use the tips of your finger to push the meat into the casing. When filled, remove it from the funnel and tie the other casing end closed.
** Important tip. Make just ONE sausage first, fry it up, and taste it to ensure that it’s to your liking. If not, adjust the ingredients as needed (salt, oil, etc).
 finished homemade sausages (Small)
homemade sausage (Small)
And voila, you have a homemade sausage made with leftover juicing pulp!
Homemade Sausage Made with Leftover Juicing Pulp
Enjoy it in the morning with breakfast or add it to an Italian style sauce.
Posted by Jas

Share this:

  • Click to share on X (Opens in new window) X
  • Click to share on Facebook (Opens in new window) Facebook
  • Click to share on Pinterest (Opens in new window) Pinterest
  • Click to share on Tumblr (Opens in new window) Tumblr
  • Click to share on LinkedIn (Opens in new window) LinkedIn
  • Click to email a link to a friend (Opens in new window) Email
  • Click to print (Opens in new window) Print
  • More
  • Click to share on Reddit (Opens in new window) Reddit
  • Click to share on Pocket (Opens in new window) Pocket

Filed Under: Food & Recipes Tagged With: homemade sausage, how to make sausage, juicing ideas, juicing pulp, juicing pulp ideas, juicing recipes, leftover juice pulp ideas

Easy Fall Yard Decorating Tips

September 21, 2015 By LovingOurHome.com Leave a Comment

It’s no wonder why fall is a favorite season for many people. The weather is still somewhat warm, but breezy and the sun is still shining. This is the perfect time to really enjoy your outdoor yard area. Here are some easy fall yard decorating tips that will allow you to transform your yard into an inviting and relaxing space for yourself and your friends.

Fall Yard

Outdoor Seating

There is nothing more disappointing than sitting outdoors on a chair that is not comfortable. Invest in Adirondack style chairs for the fall. These chairs are so comfortable that cushions are not really required. Find a chair that has a matching ottoman or pair it with a different foot stool.

Adirondack Chairs

Arranging Chairs for Guests

The seating arrangement is key to creating an inviting atmosphere that encourages group conversations. So if you plan to have friends over this fall, arrange your seats in a tight arch or circle to ensure that your guests feel connected and engaged with one another. You can look forward to an evening of laughter and conversation.

Fire Pit

Now, to make accommodations for the chilly nights, simply add a fire pit to the center of your circle. You can get a fire pit on Amazon for about $50. This will provide much needed heat for you and your guests. You can even roast marshmallows and hot dogs, on a stick found within your yard, for a camp like experience. Just make sure you follow all safety instructions before and after lighting the fire pit.

Fire Pit

Bug Protection

To make you and your guests even more comfortable in your yard this fall, purchase pumpkin scented citronella candles to keep unwanted bugs at bay. Light these candles at least thirty minutes before your guests arrive for the best results (and aroma). Remember to extinguish the candles at the end of the night so that they’ll be good for future use.

Hanging Deck Lights

If you have a deck, decorate it for those fall evenings with icicle lights. These are holiday lights with strings that hang down like icicles. Look for white or orange lights to create a really delightful atmosphere after dark. Also, get yourself a beautiful pumpkin for the season and arrange it near your seating area in a bed of leaves (you’ll probably have plenty of those available).

Icicle Lights

Your outdoor space can become the most relaxing area of your home with a few tweaks. It is great for star gazing, whether you’re alone or with others. You can even transform your backyard into a place for a romantic autumn evening with that special someone.

Get started on these easy fall yard decorating tips and have fun this fall!

Posted by Eve

Image credits: Flickr/jamesjordan, Flickr/secretwinter, Amazon

Share this:

  • Click to share on X (Opens in new window) X
  • Click to share on Facebook (Opens in new window) Facebook
  • Click to share on Pinterest (Opens in new window) Pinterest
  • Click to share on Tumblr (Opens in new window) Tumblr
  • Click to share on LinkedIn (Opens in new window) LinkedIn
  • Click to email a link to a friend (Opens in new window) Email
  • Click to print (Opens in new window) Print
  • More
  • Click to share on Reddit (Opens in new window) Reddit
  • Click to share on Pocket (Opens in new window) Pocket

Filed Under: Home Decor and Design, Parties, Events, Holidays, Fun, Yard Work & Gardening Tagged With: fall tips, fall yard decorating, home decor, yard decorations

Back to School Tips for Parents

September 20, 2015 By LovingOurHome.com Leave a Comment

Now that summer is over and the kids are back to school, you might need some help getting back into the “back to school” routine — rising early, getting the kids off to school, picking them up, attending their sports games and more. Here are a few back to school tips for parents:

1) Have a talk with your kids. Explain that families must work together as a team in order to be functional. Everyone has a job to do to make things run smoothly.

2) Everyone’s clothing should be chosen the night before so that time is not wasted in the morning choosing an outfit. Pick one or two days out of the week to do laundry (like Sunday night) to ensure that the kids always have something clean to wear. If your children are over the age of 12, assign them laundry duty on an alternating schedule.

School Supplies

3) A great day begins with a balanced breakfast — try to put together a breakfast that has at least one protein and one vegetable to give your kids a good start. Everyone’s morning will be made much easier if the meal is already prepped in the refrigerator the night before school. For instance, you can bake bacon in the toaster oven the night before and then heat it up in the morning. Choose healthy foods that can be heated quickly in the toaster oven.

4) Make large dinners that can feed your family for more than one meal. For example, make an extra large lasagna and put the remaining lasagna into the freezer or refrigerator to be heated and eaten another day. If you always make large dinners you will spend less time in the kitchen and more time with your family.

5) Get your children into the habit of completing their homework directly after school. After work is completed and checked by a parent, have each child place his or her backpack at the front door. Make them responsible for ensuring that all necessary items are placed in the school bag and ready for the next day.

6) Set up a “lunch line” on the kitchen counter right before bed, and have your children help out. You’re responsible for the sandwiches, one of the kids can put snacks in each lunch box and another packs it into the fridge. Turn it into family time — something that your kids will look forward to. Play some upbeat music and have a few non-sugary snacks available for them to enjoy (like chips and dip or salsa).

7) Purchase an alarm clock for each child. Then teach them how to set the clock as well as the alarm. Children love responsibility so give it to them. Explain that this is what adults have to do to be on time for work when they get older. It will also help them get prepared for college — a lot of kids are so used to having their mom wake them up for school that they have a hard time being on time when they’re on their own and need to attend classes.

8) Buy a large white dry erase board and detail each child’s responsibility before and after school. This way you as a parent are not repeating yourself on a daily basis regarding chores etc. Always remember to reward the child for completing all tasks that are on the board.

Use these back to school tips for parents to get your household in order this fall and beyond. The sooner you begin to organize your home, family and schedule, the better. Remember that children need to be raised with a sense of independence and taught not to completely rely on their parents — teach them early!

Posted by Eve

Image credit: Flickr/meddygarnet

Share this:

  • Click to share on X (Opens in new window) X
  • Click to share on Facebook (Opens in new window) Facebook
  • Click to share on Pinterest (Opens in new window) Pinterest
  • Click to share on Tumblr (Opens in new window) Tumblr
  • Click to share on LinkedIn (Opens in new window) LinkedIn
  • Click to email a link to a friend (Opens in new window) Email
  • Click to print (Opens in new window) Print
  • More
  • Click to share on Reddit (Opens in new window) Reddit
  • Click to share on Pocket (Opens in new window) Pocket

Filed Under: Parenting Advice & Tips, Parties, Events, Holidays, Fun Tagged With: back to school, parenting advice, tips for parents

Tasty 10 Minute Meal Ideas for Kids

September 20, 2015 By LovingOurHome.com Leave a Comment

When the kids are back to school, of course they arrive home at the end of a long day HUNGRY. But you’ve had a long day too. You don’t always have to stress about making a big dinner — here are a few easy to make, tasty 10 minute meal ideas for kids.

Chicken Wrap - 10 Minute Meal Ideas

Chicken Wraps With Honey Mustard Sauce
Wraps are filling and quick to make. Just quickly grill some sliced chicken breast in olive oil. Place a few slices on a wrap of your choice, then add lettuce and shredded cheese. Make your sauce by combining Dijon mustard and a bit of honey. Drizzle the sauce on top and fold wrap. If you don’t feel like grilling the chicken, substitute it with a few slices of deli turkey meat.

Mouth Watering Mini Sliders
Sliders are always a hit with young kids, and they’re easy to make. In a large bowl add the ground meat of your choice, whether it’s ground beef, chicken, pork or turkey. Add Worcestershire Sauce to the ground beef and combine with a spoon or your fingers. Now make little sliders out of the meat and fry them on medium-high heat (about 4 minutes each side). If you can not find small buns for your sliders, simply take a large cup and press the rim onto a slice of bread. Put slices of cheese and other condiments on the table so that your kids can dress up their dinner themselves.

Shish Kabobs With Yogurt Sauce
Cut chicken breast into large cubes. Then cut onions and peppers into cubes. Start your skewer with onion then the chicken then pepper. Repeat. Generously sprinkle Greek seasoning on the skewers. Grill it in a pan or a George Foreman grill. While it’s cooking, mix Greek yogurt, parsley, salt and pepper in a bowl until well combined. When skewers are done drizzle the sauce on top. (FYI if using wooden skewers soak them in water so the skewer does not burn and cut off any pointy ends for safety.) This meal can be served on a bed of cucumbers or on top of a salad.

Stay tuned for even more 10 minute meal ideas for kids to help make meal time easier for you and your family.


Photo credit: Flickr/dannynic

Share this:

  • Click to share on X (Opens in new window) X
  • Click to share on Facebook (Opens in new window) Facebook
  • Click to share on Pinterest (Opens in new window) Pinterest
  • Click to share on Tumblr (Opens in new window) Tumblr
  • Click to share on LinkedIn (Opens in new window) LinkedIn
  • Click to email a link to a friend (Opens in new window) Email
  • Click to print (Opens in new window) Print
  • More
  • Click to share on Reddit (Opens in new window) Reddit
  • Click to share on Pocket (Opens in new window) Pocket

Filed Under: Food & Recipes, Parenting Advice & Tips, Things That Make Life Easier Tagged With: 10 minute meals, dinner for kids, kid friendly dinners, mini sliders, shish kabobs, yogurt sauces

Pork Wraps Made with Boneless Ribs

September 18, 2015 By LovingOurHome.com Leave a Comment

This recipe for Pork Wraps Made with Boneless Ribs is a way to put those frozen, boneless leftover ribs from summer barbecues to good use. This wrap is an unique way to use the ribs to feed you and your entire family. With just a few added ingredients, you have a delicious meal.

Pork Wraps with Boneless Ribs

Ingredients

1-2 Lbs boneless pork ribs (beef boneless ribs are ok)
1/4 cup of oil
1-2 tablespoons mesquite seasoning
1/4 cup of barbecue sauce (your choice)
1/4 cup of red onion thinly sliced (white onion is ok)
3 large mushrooms thinly sliced
4-5 baby peppers (red, yellow, orange) sliced into rings
3 tablespoons flour
2-4 white flour tortilla wraps

Instructions

In a large sauce pan add 1-2 tablespoons of oil and place in diced onions, mushrooms and peppers. Sauté until tender. Remove from pan. Now, slice ribs into 1/4 inch pieces and season with mesquite seasoning. Then add flour to coat ribs. Put your sauce pan on medium high heat, add oil and fry rib pieces on both sides until it is golden brown. Add cooked onions, mushrooms and peppers to pan with rib meat. Sauté for about 3-4 minutes. Remove from heat. Place tortillas on a plate in the microwave and warm. Divide rib meat mixture evenly onto tortillas and drizzle barbecue sauce generously on top. Create your wrap.

Enjoy this recipe for Pork Wraps Made with Boneless Ribs with a drizzle of greek yogurt or ranch dressing!

Posted by Eve

Share this:

  • Click to share on X (Opens in new window) X
  • Click to share on Facebook (Opens in new window) Facebook
  • Click to share on Pinterest (Opens in new window) Pinterest
  • Click to share on Tumblr (Opens in new window) Tumblr
  • Click to share on LinkedIn (Opens in new window) LinkedIn
  • Click to email a link to a friend (Opens in new window) Email
  • Click to print (Opens in new window) Print
  • More
  • Click to share on Reddit (Opens in new window) Reddit
  • Click to share on Pocket (Opens in new window) Pocket

Filed Under: Food & Recipes Tagged With: boneless ribs, evelyns recipes, family dinner, pork ribs, pork wrap, recipes

  • « Go to Previous Page
  • Page 1
  • Interim pages omitted …
  • Page 13
  • Page 14
  • Page 15
  • Page 16
  • Page 17
  • Interim pages omitted …
  • Page 51
  • Go to Next Page »

Primary Sidebar

Categories

  • Beauty Tips
  • Cat Central
  • Dating, Love and Relationships
  • Food & Recipes
  • Health and Wellness
  • Home Buying or Renting
  • Home Care and Cleaning
  • Home Decor and Design
  • Home Equipment and Appliances
  • Home Finance and Budgeting
  • Home Improvement
  • Home Tips
  • Life Thoughts by Jas
  • Light Simple
  • Motivation and Self Help
  • Parenting Advice & Tips
  • Parties, Events, Holidays, Fun
  • Pest Control
  • Pets
  • Product Reviews
  • Quick Tips
  • Quotes
  • Shopping Advice
  • Special Deals
  • Summer Products
  • The Funnies
  • Things That Make Life Easier
  • Uncategorized
  • Yard Work & Gardening

Copyright © 2025 · Genesis Sample on Genesis Framework · WordPress · Log in