• Skip to primary navigation
  • Skip to main content
  • Skip to primary sidebar
  • Home
  • Posts
    • Home Care and Cleaning
    • Home Decor and Design
    • Yard Work & Gardening
    • Food & Recipes
    • Pets
    • Health and Wellness
    • Motivation and Self Help
    • Home Tips
    • Parenting Advice & Tips
    • Parties, Events, Holidays, Fun
    • Things That Make Life Easier
    • Home Finance and Budgeting
    • Shopping Advice
  • Cat Central
  • Share a Home Tip
  • Got a Question?

Loving Our Home | Home Tips, Advice, and Easy Recipes

Simple Home Tips and Solutions

Getting Mold off of a Warm Refrigerator (Question Answered)

July 29, 2014 By LovingOurHome.com Leave a Comment

Removing mold from a warm refrigerator (question answered).

Home Question from Twitter:

LG_refrigerator_interior
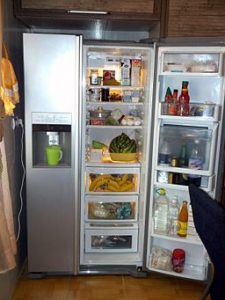
“@LovingOurHome can you pls suggest a way to remove mould from the rubber beading of my refrigerator door-switched it off during a vacation”

Answer Posted by Lorraine (how to remove mold on a refrigerator):

“I used 3 parts hot water and 1 part bleach to safely kill mold. Use a cleaning cloth to clean and saturate rubber. Repeat until mold is not present. Last step is to then use hot water to remove any excess bleach left behind. All done while wearing gloves and proper ventilation. The green way is to use vinegar and water. I believe bleach is much more beneficial to remove all the mold.

Also for weekly maintenance use white vinegar(in a spray bottle) and baking soda (will sizzle) to clean once a week for 2 weeks to totally eradicate.

Also recommend not turning off fridge. Warm air with no ventilation creates mold. Recommend turning fridge temp down while on vacation.

Hope this helps!”


Click here to share a home tip with LovingOurHome.com . If published we’ll include your Twitter handle or website!


Share this:

  • Click to share on X (Opens in new window) X
  • Click to share on Facebook (Opens in new window) Facebook
  • Click to share on Pinterest (Opens in new window) Pinterest
  • Click to share on Tumblr (Opens in new window) Tumblr
  • Click to share on LinkedIn (Opens in new window) LinkedIn
  • Click to email a link to a friend (Opens in new window) Email
  • Click to print (Opens in new window) Print
  • More
  • Click to share on Reddit (Opens in new window) Reddit
  • Click to share on Pocket (Opens in new window) Pocket

Filed Under: Home Care and Cleaning Tagged With: bleach, kitchen cleaning, mold, refrigerator, vinegar uses

Homemade Hummus

July 25, 2014 By LovingOurHome.com Leave a Comment

As I get older, I am finding that I am beginning to try new foods. For years, my friends have been talking about how tasty hummus with tortilla chips is. At my age, I now prefer to make my snacks at home because of the harmful ingredients found in store bought snacks. So I have come up with my own recipe. I compiled this recipe from my friends different family recipes. I picked and chose the ingredients I wished to combine to my desired pallet.

Ingredients:

2 cans of Chick Peas (garbanzo beans)
1/2 cup of Tahini sauce ( found in most supermarkets)
1 teaspoon of Cumin
1-2 pinches of Cayenne Pepper
2 teaspoons of fresh minced Garlic
1/2 teaspoon Salt
1 tablespoon of Extra Virgin Olive Oil
1/3 teaspoon Lemon Juice
1/2 cup of Water
1/4 cup of Pie Nuts (garnish)
1 Sprig of Parsley or Cilantro (Garnish)

Instructions ( most ingredients will be put in a food processor):

One of my favorite Tahini sauces.

Open 2 cans of chick peas and drain excess water
Place chick peas into a large food processor
Pulse chick peas until chunky
Add tahini sauce to processor
Pulse until smooth
Add remaining ingredients-
Lemon juice
Cumin
Cayenne
Minced garlic
Salt
Extra Virgin Olive Oil
Pulse until all ingredients are very well blended
Taste- add more salt if needed
Hummus should have a thick consistency (if thinner is preferred add more water and extra virgin olive oil)
Remove Hummus and place in storage container
Place in refrigerator for 1 hour to allow flavors to combine

I served this with my friends at a party and received rave reviews. I have even gone so far as to using it to replace mayonnaise on a sandwich. I must admit that it was not bad. Try it!!

ENJOY!!!!!


Posted by Lorraine

Share this:

  • Click to share on X (Opens in new window) X
  • Click to share on Facebook (Opens in new window) Facebook
  • Click to share on Pinterest (Opens in new window) Pinterest
  • Click to share on Tumblr (Opens in new window) Tumblr
  • Click to share on LinkedIn (Opens in new window) LinkedIn
  • Click to email a link to a friend (Opens in new window) Email
  • Click to print (Opens in new window) Print
  • More
  • Click to share on Reddit (Opens in new window) Reddit
  • Click to share on Pocket (Opens in new window) Pocket

Filed Under: Food & Recipes Tagged With: food, homemade, hummus, recipes

Spanish Style Steak with Rice and Beans

July 25, 2014 By LovingOurHome.com Leave a Comment

I have been preparing this meal for my family for many years. This Spanish Style Steak recipe may look complicated, but really it is not. It is mainly about having the correct seasonings. Once you or your family taste this recipe it will become a meal that is asked for weekly. This recipe will feed a family of 4, graciously!!!

Ingredients:

3 to 4 lbs Chuck Eye Steak (or steak of your choice)
1 large Sweet Onion
1/2 large Green Pepper
3 teaspoons Adobo Seasoning
1 can Red Kidney Beans
1 large Garlic Clove
1 cup Long Grain Rice
2 tablespoons of oil ( oil of your choice)

Instructions:

Rice

Place 2 cups of water in a medium sized pot
Bring to rapid boil
Add 1 teaspoon of Adobo into boiling water
Add 1 cup of rice
Add 1 tablespoon of oil (prevents rice from sticking together)
Stir rice, oil and seasonings together
Bring back to a boil
Cover rice with lid and put heat on low
Allow to cook 20 minutes (do not remove lid while rice is cooking)

Beans

Open 1 can red kidney beans (or beans of your choice)
Pour into sauce pan on medium heat
Peel and coarsely chop garlic
Add garlic to beans
Stir and bring beans to a simmer then cover with lid for approximately 4-5 minutes
Turn heat off, leave the beans covered to allow them to stay warm

Steak, Onion, Pepper

In a large fry pan place 2 tablespoons of oil and set temperature to medium high
Slice onion and pepper into strips and place into fry pan
Toss/ coat onion and pepper in the fry pan
Cook until soft
Remove from pan, place on plate, put aside

Place heat on medium high and allow fry pan to get hot
Season steak on both sides with 2 teaspoons of adobo seasoning
Add steak to fry pan, add onions and peppers also
Fry steak for 3-4 minutes on each side (depending on the thickness of your steak)

My family and I enjoy having this meal with a side salad, that consists of lettuce, feta cheese, sliced onion, tomatoes with a vinaigrette dressing.

Salud!!!!

Share this:

  • Click to share on X (Opens in new window) X
  • Click to share on Facebook (Opens in new window) Facebook
  • Click to share on Pinterest (Opens in new window) Pinterest
  • Click to share on Tumblr (Opens in new window) Tumblr
  • Click to share on LinkedIn (Opens in new window) LinkedIn
  • Click to email a link to a friend (Opens in new window) Email
  • Click to print (Opens in new window) Print
  • More
  • Click to share on Reddit (Opens in new window) Reddit
  • Click to share on Pocket (Opens in new window) Pocket

Filed Under: Food & Recipes Tagged With: arroz y frijoles, food, rice and beans, spanish recipes, spanish style steak

Homemade Pico De Gallo

July 25, 2014 By LovingOurHome.com Leave a Comment

Have you ever visited a Mexican restaurant and had the pleasure of tasting their Pico De Gallo with corn chips as an appetizer? I fell in love with Pico De Gallo at the first taste. The flavors were crisp and fresh. I thought I could purchase a store brought version to have the same great experience. Sadly, it tasted horrible and the ingredients were appalling. I decided, based on my memory of the ingredients of the Pico at the restaurant, to try to make it on my own.

Wow! I could not believe that I made my own Pico De Gallo at home, using fresh ingredients on the first try. I now, am sharing my “secret” recipe with all who appreciate Pico De Gallo. This recipe will yield enough to feed a party of 12, happily!!!!

Ingredients:

8 Large Ripe Tomatoes
1/2 Red Onion (optional)
2 Jalapeño peppers
4 Garlic Cloves
1 Large Bunch Cilantro (fresh)
2 Limes
1/4 Cup Red Wine Vinegar
1/2 Teaspoon Salt (to taste)

Instructions:

Cut tomatoes into 1/4’s
With your fingers remove the seeds (do not do this under water, will ruin tomatoes texture)
Dice tomatoes & put into large bowl (use a sharp knife)

1/2 medium red onion (Optional)
Remove outer skin
Cut into chunks
Place in food processor and pulse until small onion pieces are achieved
Add diced red onion to tomatoes

Remove the stem of the jalapeño pepper
Slice pepper into two pieces (vertically)
Remove seeds (do not touch your eyes or face when cutting this pepper)
Pulse in food processor, until finely chopped
Add jalapeño peppers to tomatoes in the bowl

Peel 4 garlic cloves
Pulse in food processor, until garlic is finely chopped
Add garlic to bowl with the other ingredients

Cut the bottom stems of the cilantro
Rinse cilantro in water( to remove any dirt )
Chop roughly and place in food processor, pulse until finely chopped
Place in bowl

Cut the 2 limes in half
Squeeze the juice over the ingredients in the bowl

Add 1/4 cup of red wine vinegar to bowl

Add 1/2 teaspoon of salt to bowl (to taste)

With a large spoon mix the ingredients

Taste to decide if more salt is needed.

Mixture needs to marinate at least for an hour so that all the flavors become combined.

To serve, place Pico in a large festive bowl and serve with corn chips.

ENJOY!!!!!!

Share this:

  • Click to share on X (Opens in new window) X
  • Click to share on Facebook (Opens in new window) Facebook
  • Click to share on Pinterest (Opens in new window) Pinterest
  • Click to share on Tumblr (Opens in new window) Tumblr
  • Click to share on LinkedIn (Opens in new window) LinkedIn
  • Click to email a link to a friend (Opens in new window) Email
  • Click to print (Opens in new window) Print
  • More
  • Click to share on Reddit (Opens in new window) Reddit
  • Click to share on Pocket (Opens in new window) Pocket

Filed Under: Food & Recipes Tagged With: food, homemade, mexican food, pico de gallo, recipes

A $2 Solution to Secure Your Fitted Sheets So that They Don’t Slide Around

July 25, 2014 By LovingOurHome.com Leave a Comment

One of my biggest pet peeves is having my fitted sheets slide off the bed while I’m sleeping or trying to watch Netflix in peace. It’s messy, uncomfortable and you have to re-tuck the sheet back under your mattress each morning. Madness.

The simple solution to secure your fitted sheets is to get a pair of what are called Sheet Suspenders. They use suspender-like straps to secure either side of the fitted sheet beneath the mattress using clips.

But I felt like going the cheaper route, so I went to the dollar store and picked up 2 things:

– an elastic bandage (about 3″ wide)
– binder clamps (the type you use to hold a thick stack of paper)

IMG_1474

$2 … Pick it up! (That’s a little expression my friends and I used to say when something was really easy, peasy).

You can probably already get a visual of what the plan is here.

First, I measured the width of the bed. The bed I was fitting was 39″ (yes, just enough room for me and my cat, don’t judge me!!).

I cut the elastic bandage so that it was a few inches less than the width of the bed (about 36″) because it needs to stretch a bit.

Next, I folded the bandage in half (lengthwise or widthwise) and used two binder clamps to hold it closed. This was just so that I could cut the bandage do that it was thinner.

IMG_1475

IMG_1476

Once it was cut, I took the end of one piece and looped it into the handle of one of the binder clamps. I double knotted the elastic band for security, then repeated the process on the other end of the band.

When you’re done you’ve got a crude version of a suspender strap for your fitted sheet.

IMG_1477

It isn’t pretty, but who is going to see what’s going on under your mattress?

I took one clamp and connected it to the bottom of one side of the fitted sheet, then pulled it over to the other side to clamp that side in place. Repeat the process on the other side. Hold in your core while you’re lifting the mattress — you can do it!

Voila — a quick $2 solution to secure your fitted sheets and prevent them from sliding off while you’re sleeping. Got a better suggestion for securing fitted sheets so that they stay in place? Post it in the comments below!

Posted by Jasmine


Share this:

  • Click to share on X (Opens in new window) X
  • Click to share on Facebook (Opens in new window) Facebook
  • Click to share on Pinterest (Opens in new window) Pinterest
  • Click to share on Tumblr (Opens in new window) Tumblr
  • Click to share on LinkedIn (Opens in new window) LinkedIn
  • Click to email a link to a friend (Opens in new window) Email
  • Click to print (Opens in new window) Print
  • More
  • Click to share on Reddit (Opens in new window) Reddit
  • Click to share on Pocket (Opens in new window) Pocket

Filed Under: Home Care and Cleaning, Home Decor and Design Tagged With: bedding solutions, mattress, secure fitted sheets, sheet suspenders

Flossing Your Teeth Is Not an Option, It’s a Necessity (My Story)

July 23, 2014 By LovingOurHome.com Leave a Comment

Coming up as a kid, I was taught to brush twice per day, but I wasn’t taught about the importance of flossing your teeth. I rarely if ever flossed my teeth at all throughout my younger years.

Unfortunately this bad habit followed me into my young adulthood. My teeth were pretty and white but my gums were red and bleeding. One day when I was about 23 years old I finally got the courage to go to the dentist after many years (I had a mild case of dental phobia).

“You’ve got gum disease,” the dentist said.

The cold and uncaring dentist went on to tell me that I had to have a long list of teeth extracted and I burst out in tears in his chair. All of my worst fears were coming true.

After I left his office I dried my eyes and decided “heck no! I am not going to let him do that!”

dreamstimefree_259779
© Kmitu | Dreamstime Stock Photos

Dental School Saves the Day
I decided to go to a periodontist at a local dental school instead of going back to that first dentist. I like dental schools because they know all about the latest technologies and treatments. The head periodontist at the school took me on as a special case because what I had was rare — it’s called juvenile periodontitis. Most people don’t have perio problems until they are in their 50s or older. 23 was ridiculously young for this to be happening. It’s something that some dentists believe is hereditary, as several of my family members had the same thing.

But gum disease is a condition that develops aggressively mostly due to lack of proper care. For 23 years I brushed my teeth diligently (which is why they were in good condition) but I almost never flossed! I went to bed night after night with food particles and soft plaque between my teeth. It’s no wonder why bacteria continuously ate away at my gums and bone tissue. My periodontist told me on several occasions that flossing was crucial to the healing process and maintaining healthy gums.

Getting Treated
It took me a number of visits — root planings (deep cleanings) and eventually periodontal surgeries (scaling beneath the gums and bone grafting) to finally remove the bad bacteria. They healed my gums — I was even able to get braces to improve my smile.

Over a decade later I am so glad that I didn’t listen to that cold-hearted dentist. I floss every day and my mouth feels great (pink, healthy gums, nice smile). I can’t stress enough the importance of flossing regularly — dentists recommend a minimum of once per day (once after every meal if possible). It’s one of the best ways to ensure a good report from your dentist at each visit.

One Last Tip — Good Diet Matters
Eating a good diet is also important to good dental health — drink a lot of water and eat plenty of fruits (green grapes are great) and vegetables (spinach and green leafy veggies) in addition to your regular dental visits.

Posted by Jasmine

Share this:

  • Click to share on X (Opens in new window) X
  • Click to share on Facebook (Opens in new window) Facebook
  • Click to share on Pinterest (Opens in new window) Pinterest
  • Click to share on Tumblr (Opens in new window) Tumblr
  • Click to share on LinkedIn (Opens in new window) LinkedIn
  • Click to email a link to a friend (Opens in new window) Email
  • Click to print (Opens in new window) Print
  • More
  • Click to share on Reddit (Opens in new window) Reddit
  • Click to share on Pocket (Opens in new window) Pocket

Filed Under: Health and Wellness Tagged With: dental care, dental health, dental schools, flossing, going to the dentist, gum disease, juvenile periodontitis, oral care, oral health, periodontal disease

  • « Go to Previous Page
  • Page 1
  • Interim pages omitted …
  • Page 42
  • Page 43
  • Page 44
  • Page 45
  • Page 46
  • Interim pages omitted …
  • Page 51
  • Go to Next Page »

Primary Sidebar

Categories

  • Beauty Tips
  • Cat Central
  • Dating, Love and Relationships
  • Food & Recipes
  • Health and Wellness
  • Home Buying or Renting
  • Home Care and Cleaning
  • Home Decor and Design
  • Home Equipment and Appliances
  • Home Finance and Budgeting
  • Home Improvement
  • Home Tips
  • Life Thoughts by Jas
  • Light Simple
  • Motivation and Self Help
  • Parenting Advice & Tips
  • Parties, Events, Holidays, Fun
  • Pest Control
  • Pets
  • Product Reviews
  • Quick Tips
  • Quotes
  • Shopping Advice
  • Special Deals
  • Summer Products
  • The Funnies
  • Things That Make Life Easier
  • Uncategorized
  • Yard Work & Gardening

Copyright © 2025 · Genesis Sample on Genesis Framework · WordPress · Log in