• Skip to primary navigation
  • Skip to main content
  • Skip to primary sidebar
  • Home
  • Posts
    • Home Care and Cleaning
    • Home Decor and Design
    • Yard Work & Gardening
    • Food & Recipes
    • Pets
    • Health and Wellness
    • Motivation and Self Help
    • Home Tips
    • Parenting Advice & Tips
    • Parties, Events, Holidays, Fun
    • Things That Make Life Easier
    • Home Finance and Budgeting
    • Shopping Advice
  • Cat Central
  • Share a Home Tip
  • Got a Question?

Loving Our Home | Home Tips, Advice, and Easy Recipes

Simple Home Tips and Solutions

Meke’s Homemade Pickles

August 15, 2014 By LovingOurHome.com Leave a Comment

As a child, I always enjoyed store bought pickles. One year my dad taught my siblings and I how to grow fruits and vegetables in our backyard. I can remember the first time he made pickles at home, using the cucumbers from the garden. Wow, everyone was amazed at how totally awesome these homemade pickles tasted. The only problem us kids had was waiting for the pickles to become ready to eat.

You see, it took about two weeks until we could enjoy the pickles. He had to let them ferment at the top of our hallway closet. It was torture!!! Well, even though I am much older now, I still have not lost my taste for pickles. I was tired of buying pickles from the store that had unnecessary ingredients and additives to keep the pickles safe for consumption for a long period of time. So I tweaked my dad’s recipe and came up with my own. My recipe allows you to enjoy the pickles in about 2-3 hours. I still owe my dad major thanks for showing me how to make pickles at home.

THANKS DAD!!!

Ingredients

pickles1 Glass Mason Jar with Lid
1 Long English Cucumber
2 Teaspoons of Salt
1/4 Teaspoon of Black Pepper
3 Teaspoons of Dry Dill
1 Cup White Vinegar ( if you enjoy really tangy pickles you can increase the vinegar to 1 1/2 cups )
Water ( the correct amount of water is determined by how much vinegar is added to jar )
2 Garlic Cloves ( Optional, only for those who enjoy garlic flavored pickles )

I prefer English cucumbers because they are seedless and have a firm inner texture. You can use any cucumber of your liking to enjoy this pickle recipe.

Instructions

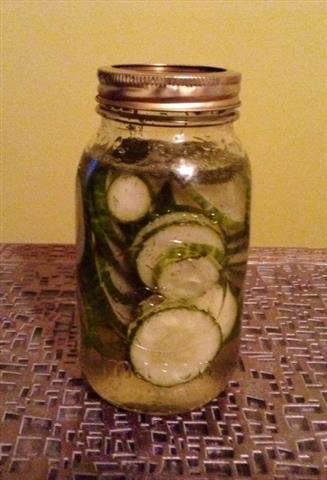
Slice the cucumber into 1/4 inch slices
Place all slices in the mason jar
Add-
Salt, Pepper, Dill and Garlic (if you prefer)
Add-
White Vinegar
Add-
Water to almost the top of rim of mason jar

Tightly screw on the lid

Gently (do not shake) turn jar upside down 2-3 times to mix ingredients together.

Place in the refrigerator for about 2-3 hours.

The longer you allow the pickles to sit in the jar, the more tastier they will become.
I have tried and failed to make these recipe work with using red wine vinegar. So I only recommend using white vinegar.

Enjoy your Homemade Pickles!!!

pickles


Posted by Meke


Share this:

  • Click to share on X (Opens in new window) X
  • Click to share on Facebook (Opens in new window) Facebook
  • Click to share on Pinterest (Opens in new window) Pinterest
  • Click to share on Tumblr (Opens in new window) Tumblr
  • Click to share on LinkedIn (Opens in new window) LinkedIn
  • Click to email a link to a friend (Opens in new window) Email
  • Click to print (Opens in new window) Print
  • More
  • Click to share on Reddit (Opens in new window) Reddit
  • Click to share on Pocket (Opens in new window) Pocket

Filed Under: Food & Recipes Tagged With: homemade pickles, pickles recipe, recipes

Evelyn’s Homemade Jamaican Beef Patties

August 14, 2014 By LovingOurHome.com Leave a Comment

One day, I had a hankering for Jamaican beef patties. Then, I remembered, that some years back, a Jamaican friend of mine gave me her family’s recipe. So, I searched my recipe box to find it. I was thrilled that I found the recipe titled “Nanny’s Beef Patty.” The instructions were in two parts: 1 part beef filling and 1 part dough. I made a few adjustments to satisfy my taste buds. If you make this recipe correctly, you will never look at a store bought beef patty with the same affection. IRIE!!!!

What Jamaican Beef Patties Look Like

Ingredients:

Beef Filling

1 LB Lean Ground Beef
2-3 Large Cloves of Garlic, Finely Chopped
1/2 Cup of Chicken Stock
1 Medium Onion, Finely Chopped
1/2 Cup of Unseasoned Bread Crumbs
1/2 Teaspoon Salt
1/4 Teaspoon Pepper
3/4 Teaspoon of Jamaica Curry Powder
1 Teaspoon of Allspice
1 Teaspoon of Thyme ( dry )

Pastry

4 Cups White All Purpose Flour
2/3 Cups Water
1 Teaspoon Jamaican Curry Powder
3/4 Cup of Butter (room temperature )
1 Teaspoon Salt

Instructions:

(Make beef filling first because it needs to cool off before you put it inside pastry dough.)

Pre-Heat a Large Sauce Pan on Medium High Heat
Add Ground Beef
Add Chopped Onion
Add Chopped Garlic ( add garlic last, so that it doesn’t burn )

Brown the ground beef until thoroughly cooked along with the onion and garlic.
Make sure to properly break up ground beef, so there are no chunks of meat in the sauce pan.
When meat, onion and garlic is done, remove from heat and drain excess oil from sauce pan.
Return sauce pan to stove with the heat setting on low.
(The reason why I don’t add the other ingredients to the meat while cooking, is because I feel you lose a certain amount of flavor when the seasonings are added to the meat before you remove the excess oil from sauce pan.)
Now you can add your other ingredients.

Add the remaining ingredients to the sauce pan and combine.
Taste the mixture to ensure that it contains enough salt.
Sauté mixture for about 3 minutes.
Remove from heat, without the lid.

Making the Pastry 

In a large mixing bowl, add all your dry pastry ingredients including the butter.
Use your fingers to incorporate the butter with the flour and seasonings.
Slowly add water to mixture.
Mixture should look crumbly, not wet.
Make the dough into a ball and place onto a lightly floured surface. ( so dough doesn’t stick to surface )
Kneed with the palm of your hand for about 2 minutes.
Return dough to bowl and tightly cover with plastic wrap.
Allow the dough to rest for about 20 minutes, while the beef filling continues to cool.

After the dough has rested, preheat oven to 400 degrees.

Remove dough from bowl and place on a floured surface. Make the balls a little bigger than a golf ball.
Take floured rolling pin and roll dough to make a thin oval shape. (Doesn’t have to be perfect, will taste great anyway)
Repeat the steps for each dough ball made.

On a large non stick baking sheet, place 1 dough oval on the baking sheet and fill it with approximately 1/4 cup of beef filling in the middle of the pastry. (Filling amount depends on the size of your pastry, so add or subtract filling as needed.)

Fold dough in half, to make a half moon.
Crimp the edges together to ensure filling is kept inside of the pastry.

Repeat steps, until all pastries are made on the baking sheet.

Place baking sheet in the oven, on the middle rack.

Cook for approximately 20-30 minutes or until golden brown. (Check your Jamaican beef patties after 15 minutes)

Enjoy!!

Posted by Eve


Photo courtesy Flickr/sixteenmilesofstring

Share this:

  • Click to share on X (Opens in new window) X
  • Click to share on Facebook (Opens in new window) Facebook
  • Click to share on Pinterest (Opens in new window) Pinterest
  • Click to share on Tumblr (Opens in new window) Tumblr
  • Click to share on LinkedIn (Opens in new window) LinkedIn
  • Click to email a link to a friend (Opens in new window) Email
  • Click to print (Opens in new window) Print
  • More
  • Click to share on Reddit (Opens in new window) Reddit
  • Click to share on Pocket (Opens in new window) Pocket

Filed Under: Food & Recipes Tagged With: homemade beef patties, jamaican beef patties, recipes

Ideas for Huddles and Team Motivation

August 13, 2014 By LovingOurHome.com Leave a Comment

If you’re the coach of your child’s sports team or you’re the captain of a team at work or for intramural fun, here are a few ideas for huddles that your team can implement as motivation at practice and games.

A group huddle is a time for a team to gather close together in a circle to discuss and upcoming play or move in a competition. It is most common in sports events. A football coach named Amos Alonzo Stagg created the huddle in 1896 as a way of blocking out the racket from the crowd right before a play. The huddle is also a way to assure that all team members are on the same page and to get everyone motivated to do a good job.

Tell a Motivational Story

sports pic
© Cristina | Dreamstime Stock Photos

If you have ample time, tell a short story that will help to motivate the team during the huddle. The story can be funny or serious, but it should definitely have an educational or motivational value. You can even leave the story open-ended or rhetorical so that the members will think about the answer before going out on the playing field. If you are the coach, keep a repertoire of reflective, inspiring stories for your team on hand.

Change Up the Huddle Leader

Don’t always just let the coach or team captain say something in a huddle. Switch it up from time to time. Allow individual team members to give the short motivational speech or start a “call and response.” This will help to get everyone involved and make each team member feel equally important to the team’s purpose. Encourage each member to be creative and think of catchy phrases and chants to use in the huddle.

Also, decide on what you will all say at the end of the huddle to signify that you are ready to go play. For instance, “Go team” is a popular saying, but you can also yell out the team motto or mascot (“Wolves!”).

Handshake

Have a team meeting to decide on a secret handshake that you all will use during games. This might seem like a minor detail, but something as small as a handshake could help to unify a team. Make sure every team member is “in the know” on the handshake or else you will look disorganized. Brainstorm some fun hand signals, slaps, and claps that you can integrate into a custom handshake for team members to use during games. Rehearse it in practice, just as you would a play.

Get Nice Team Shirts to Boost Morale

Have custom team shirts made for your members to wear outside of games and practice. These should be good looking shirts that each member is proud to wear. Have each member wear his shirt on game day to show your team unity.

Use these ideas for huddles and team motivation to help take your squad to the top!

Posted by Jade


Share this:

  • Click to share on X (Opens in new window) X
  • Click to share on Facebook (Opens in new window) Facebook
  • Click to share on Pinterest (Opens in new window) Pinterest
  • Click to share on Tumblr (Opens in new window) Tumblr
  • Click to share on LinkedIn (Opens in new window) LinkedIn
  • Click to email a link to a friend (Opens in new window) Email
  • Click to print (Opens in new window) Print
  • More
  • Click to share on Reddit (Opens in new window) Reddit
  • Click to share on Pocket (Opens in new window) Pocket

Filed Under: Motivation and Self Help, Parenting Advice & Tips Tagged With: huddle ideas, kids sports, sports, team huddles, team motivations, team sports

Laptop Fingers: A Painful Condition Caused by Typing

August 13, 2014 By LovingOurHome.com Leave a Comment

Laptop fingers is a condition that can be a real pain. Here are tips to deal with laptop fingers to avoid carpal tunnel syndrome, arthritis and similar issues.

Even as I type now, I am managing a minor issue that plagues most writers, coffee shop junkies and email addicts. It is an uncomfortable condition that I call “Laptop Fingers.”

dreamstimefree_59647(1)
© Dreamstime Stock Photography & Video Footage | Dreamstime Stock Photos

Laptop Fingers occur when you spend 10 or more hours per day typing on a laptop keyboard that was designed for a person with 3 inch long hands. That, tied in with the need to move the cursor around with a tiny ball in the middle of the keyboard, or by ice skating your fingers over a smooth plastic square that somehow knows where the pointer on your screen is.

If you are on a laptop right now reading this, take your fingers right now and slowly act like you are about to move the pointer. What happened? I bet your pointer and middle fingers instinctively grew together and began serving as a pseudo mouse. Now place those fingers on the square and move them around. You can probably feel the pressure already. Now pay attention to the feeling you are creating in the base of your other two fingers. What is this doing to our fingers over time?

As someone who used to work in data entry, I know the risks and dangers of carpal tunnel. Can Laptop Fingers put you on that road? In extreme cases these problems can develop into arthritis.

In my case, the pain would sometimes grow all the way down my arm to the elbow – and that’s around the time that I decided data entry wasn’t for me – not even part-time. I mean hello, I’m a writer. What would I do if I couldn’t type because of crippling pain in between sentences?

Back to the keyboard problem. If you look at a standard PC keyboard, it is wide with huge comfortable keys and a space bar that is not the same size as the “Enter” key. These keyboards are designed to make your typing experience as comfortable as possible.

On the other hand, laptop keyboards are not ergonomically designed. They are composed of tiny, fragile keys that are squeezed together into one glob of black squares — I’m almost positive the computer manufacturer wasn’t thinking “comfortable” when creating this laptop. I also don’t think it helps when a key is missing from the keyboard, causing you to have to push down extra hard to create that letter on you screen. (Who’s going to be motivated to replace the whole keyboard over one digit?)

Here are a few simple solutions:

1) Type with a standard keyboard – most laptops have a connection where you can use an ergonomic USB keyboard.

2) Navigate with an actual computer mouse (not the little button or pad that causes you to have to scrunch your fingers together into an uncomfortable positions).

3) Take a 5-minute break from typing every 30 minutes to an hour or so to give your hands and fingers a good stretch.

4) Get an extra large laptop. Add gel wrist rests and other ergonomic features to make your typing experience more comfortable.

5) Use a speech-to-text program like Dragon Naturally Speaking to compose the majority of your writings. I’ve found that the modern speech-to-text programs are very adaptive, easy to use and save you time when you’re writing (especially if you’re composing a book or longer work).

If nothing else, make an effort to at least reduce the behaviors that may be causing you to feel the effects of “laptop fingers” as much as possible over time.

Take good care of your hands and fingers! Visit a doctor immediately if pain in your hands, fingers, wrists or arms progresses.


Posted by Jade


Share this:

  • Click to share on X (Opens in new window) X
  • Click to share on Facebook (Opens in new window) Facebook
  • Click to share on Pinterest (Opens in new window) Pinterest
  • Click to share on Tumblr (Opens in new window) Tumblr
  • Click to share on LinkedIn (Opens in new window) LinkedIn
  • Click to email a link to a friend (Opens in new window) Email
  • Click to print (Opens in new window) Print
  • More
  • Click to share on Reddit (Opens in new window) Reddit
  • Click to share on Pocket (Opens in new window) Pocket

Filed Under: Health and Wellness, Things That Make Life Easier Tagged With: arthritis, carpal tunnel, carpel tunnel, finger pain, laptop fingers, pain from typing, pain in hands, wrist pain

What Paint Color Goes with Chocolate Brown Bedding?

August 13, 2014 By LovingOurHome.com Leave a Comment

If you’re starting your room design with chocolate brown bedding, here’s the great complementary color to consider.

chocolate brown and blueChocolate brown is a rich and serene color. It can make a bedroom look more mature, formal and sophisticated. If you’ve settled on this color for your bedding, you must then consider an ideal color for your wall paint. Being that chocolate brown is one of my favorite colors, I have a personal preference when it comes to matching it up with another one of my favorite colors: blue.

According to color theory, complementary colors are located directly across from each other on the color wheel. Click here to view a color wheel. Complementary colors almost always look good together, so it’s a good practice to have a color wheel handy when designing your bedroom and deciding on a color scheme.

chocolate brown and blue2If you look at a good color wheel you’ll see that there are a number of shades of each color, including browns which are located between red and yellow. On the color wheel brown is across from shades of blue. It’s no wonder chocolate brown and blue look good together when you’re designing a bedroom or other room of your home.

So since brown and blue complement each other, focus on shades of blue when deciding on a wall paint color to go with your chocolate brown bedding. Get a lighter shade of blue, such as sky blue, turquoise or baby blue to brighten up the bedroom (you can see how these colors go together in the bedding photos here).

When picking a trim color for your wall (trim is the frame around your doors and windows) consider a darker shade of blue or an eggshell color to finish off the bedroom’s color scheme. A medium to dark hardwood floor also complements these two colors well.

Additional Accoutrements

710BjFUll6L._SL1500_Once you have your chocolate brown bedding and blue color scheme finished, you can start adding accoutrements, like window drapes and decorative elements. Match window drapes to the bedspread with either the same chocolate brown or a lighter shade of brown (such as a deep tan). Patterned drapes, such as a vertical stripes with that chocolate brown color in the pattern, is another great pick. Add a lamp the color of your dark blue trim as well to even out the décor if you’d like.

You don’t have to limit yourself to blue-start with this idea of color complements and examine the color wheel to come up with even more exciting color combinations to go with that beautiful chocolate brown colored bedding. Hope this helps answer your question of what goes with chocolate brown bedding in a bedroom!

Posted by Jade


Share this:

  • Click to share on X (Opens in new window) X
  • Click to share on Facebook (Opens in new window) Facebook
  • Click to share on Pinterest (Opens in new window) Pinterest
  • Click to share on Tumblr (Opens in new window) Tumblr
  • Click to share on LinkedIn (Opens in new window) LinkedIn
  • Click to email a link to a friend (Opens in new window) Email
  • Click to print (Opens in new window) Print
  • More
  • Click to share on Reddit (Opens in new window) Reddit
  • Click to share on Pocket (Opens in new window) Pocket

Filed Under: Home Decor and Design Tagged With: blue paint, brown and blue decor, chocolate brown bedding, chocolate brown bedroom, chocolate brown decor, paint colors

How to Stop Crying Before it Starts

August 13, 2014 By LovingOurHome.com Leave a Comment

Solutions and tips for how to stop crying before it starts.

There are some people, like myself, who sometimes have a hard time controlling their emotions — they can cry at the drop of a hat. All it takes is some type of difficult conversation or emotional moment for the waterworks to start building up. Many other people can’t understand why we cry — they see this as a sign of weakness. So you may be looking for ways to control crying and stop crying your heart out all over the place to get more respect from other people. Here are a few tips for how to stop crying before it starts.

Take a Deep Breath and Stop Talking

As someone who has been afflicted with this problem since childhood, I find that taking a deep breath when I feel the emotion building up helps a lot. You need to stop talking — the talking is where you reveal the fact that tears are coming, then you can’t control the tears when they start flowing. So deep breath, and stop yammering. Then once you get a hold of yourself, you can proceed with what you have to say, keeping the next suggestion in mind…

Shift Your Thoughts to Something Funny

When you know that you are going to be talking to someone about a topic that is pretty emotional for you, get a firm picture of something funny in your mind beforehand. Someone who fell down the stairs the week before. A funny joke someone sent you via email. A funny Youtube video. Whatever makes you laugh every time you see or think about it. Keep that picture going on in the back of your head while you talk about the emotional subject. As soon as you finish saying what’s on your mind, immediately think back to the funny thought to bring a smile to your face.

And make what you have to say quick. Don’t belabor on tough subjects and conversation if you know that you have a tendency to cry when they’re brought out.

Get Something in Your Hand to Distract You from What You are Saying

You don’t want to think too hard about the emotional subject you are discussing. That is what is triggering the tears in the first place. Thoughts being brought out from where they were formerly under lock and key is why we cry. You have to learn how to control those thoughts if you want to control crying. So one last suggestion is to have something in your hand to distract you as you are talking about a difficult issue that could make you emotional. That way your thoughts are partially on the something in your hand, whether it be a stress ball, a phone that you are playing with (maybe a silent game), or knitting job.

I know how tough it is to control crying. Some of us just have that seemingly uncontrollable urge. But you have to learn how to stop crying your heart out in order to exhibit strength in certain situations. Using these basic suggestions for how to control your crying before it even starts is a great way to start on that goal.

Posted by Jade


Share this:

  • Click to share on X (Opens in new window) X
  • Click to share on Facebook (Opens in new window) Facebook
  • Click to share on Pinterest (Opens in new window) Pinterest
  • Click to share on Tumblr (Opens in new window) Tumblr
  • Click to share on LinkedIn (Opens in new window) LinkedIn
  • Click to email a link to a friend (Opens in new window) Email
  • Click to print (Opens in new window) Print
  • More
  • Click to share on Reddit (Opens in new window) Reddit
  • Click to share on Pocket (Opens in new window) Pocket

Filed Under: Motivation and Self Help, Things That Make Life Easier Tagged With: controlling emotions, crying too much, no tears, staying strong, stop crying

  • « Go to Previous Page
  • Page 1
  • Interim pages omitted …
  • Page 39
  • Page 40
  • Page 41
  • Page 42
  • Page 43
  • Interim pages omitted …
  • Page 51
  • Go to Next Page »

Primary Sidebar

Categories

  • Beauty Tips
  • Cat Central
  • Dating, Love and Relationships
  • Food & Recipes
  • Health and Wellness
  • Home Buying or Renting
  • Home Care and Cleaning
  • Home Decor and Design
  • Home Equipment and Appliances
  • Home Finance and Budgeting
  • Home Improvement
  • Home Tips
  • Life Thoughts by Jas
  • Light Simple
  • Motivation and Self Help
  • Parenting Advice & Tips
  • Parties, Events, Holidays, Fun
  • Pest Control
  • Pets
  • Product Reviews
  • Quick Tips
  • Quotes
  • Shopping Advice
  • Special Deals
  • Summer Products
  • The Funnies
  • Things That Make Life Easier
  • Uncategorized
  • Yard Work & Gardening

Copyright © 2025 · Genesis Sample on Genesis Framework · WordPress · Log in